One of the most innovative features of Windows Phone is the Start screen with its Live Tiles. In the original release applications were limited to a single Tile that the user could pin to the Start screen from the applications list. This changed with the Mango release where a user can elect to have multiple Tiles on the Start screen, representing different parts of the application. In this article we’ll look at how you can create Live Tiles and specifically how you can dynamically create the background image for the Tiles.
We’ll start with a simple page layout containing two Button controls and an Image. The first Button will be used to launch the CameraCaptureTask in order to capture an photo from the camera. The photo will then be displayed in the Image control. Finally the second Button will tack the photo and use it as the background for a new Live Tile.
<StackPanel x:Name="ContentPanel" Grid.Row="1"
                       Margin="{StaticResource PhoneHorizontalMargin}">
    <Button Content="Take Photo" Click="CaptureClick" />
    <Border Height="200" Width="200" Padding="5"
                    Background="{StaticResource PhoneInactiveBrush}" >
        <Image x:Name="PhotoImage" />
    </Border>
    <Button Content="Create Live Tile" Click="CreateClick" />
</StackPanel>
To capture the photo we need to create an instance of the CameraCaptureTask, wire up the Completed event and call the Show method when the “Take Photo” button is pressed. The captured photo is copied into isolated storage, loaded into a BitmapImage and displayed in the Image control, PhotoImage.
private string filename;
private CameraCaptureTask camera = new CameraCaptureTask();
public MainPage() {
    InitializeComponent();

    camera.Completed += camera_Completed;
}

void camera_Completed(object sender, PhotoResult e) {
    filename = Guid.NewGuid() + ".jpg";
    using (var file = new IsolatedStorageFileStream(filename, FileMode.Create,
                FileAccess.Write, IsolatedStorageFile.GetUserStoreForApplication())) {
        e.ChosenPhoto.CopyTo(file);
    }

    DisplayImage(filename);
}

private void CaptureClick(object sender, RoutedEventArgs e) {
    camera.Show();
}

private void DisplayImage(string filename) {
    using (var file = new IsolatedStorageFileStream(filename, FileMode.Open, FileAccess.Read, IsolatedStorageFile.GetUserStoreForApplication())) {
        var image = new BitmapImage();
        image.CreateOptions = BitmapCreateOptions.None;
        image.SetSource(file);

        this.PhotoImage.Source = image;
    }
}
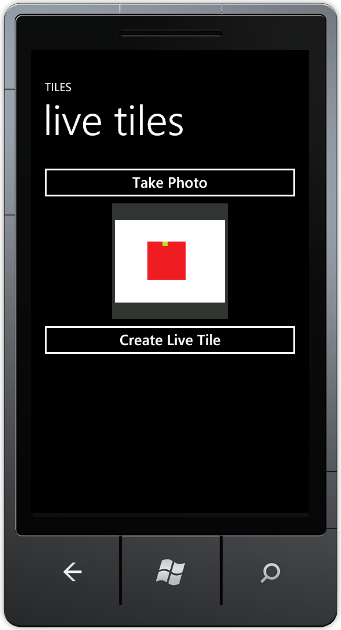
Running the code at this point will allow the user to launch the camera, capture an image and have it display within the application, as shown in Figure 1.

The next step is to create the background image for the Live Tile. We can do this by simply creating a WriteableBitmap and rendering various elements individually. However, this makes it hard to design and adjust the layout of the Tile. An alternative is to create a UserControl and use Expression Blend to layout the elements. The following UserControl code creates a simple layout with a TextBlock overlayed upon an Image control.
<UserControl
    xmlns="http://schemas.microsoft.com/winfx/2006/xaml/presentation"
    xmlns:x="http://schemas.microsoft.com/winfx/2006/xaml"
    xmlns:d="http://schemas.microsoft.com/expression/blend/2008"
    xmlns:mc="http://schemas.openxmlformats.org/markup-compatibility/2006"
    mc:Ignorable="d"
    x:Class="LiveTileSample.FrontTile"
    Width="173" Height="173"
    d:DesignWidth="173" d:DesignHeight="173">
    <Grid>
        <Image Stretch="Fill" Source="{Binding Image}"/>
        <TextBlock TextWrapping="Wrap" Text="{Binding Title}" VerticalAlignment="Top"
                                                  Margin="{StaticResource PhoneMargin}"/>
    </Grid>
</UserControl>
You’ll also note that both the Text property of the TextBlock and the Source property on the Image use data binding to determine their value. This makes it possible to easily adjust the contents of the Tile without having to adjust the UserControl itself, simply by setting the DataContext on an instance of the UserControl. The following TileData class will represent the contents of the UserControl.
public class TileData {
    public string ImageFilename { get; set; }
    public string Title { get; set; }
    public BitmapImage Image {
        get {
            using (var file = new IsolatedStorageFileStream(ImageFilename, FileMode.Open,
                        FileAccess.Read, IsolatedStorageFile.GetUserStoreForApplication())) {
                var image = new BitmapImage();
                image.CreateOptions = BitmapCreateOptions.None;
                image.SetSource(file);
                return image;
            }
        }
    }
}
When the user clicks the “Create Live Tile” button a new instance of the TileData class will be created, containing the filename of the photo captured previously and the text to be overlayed. This will be set as the DataContext on an instance of the FrontTile UserControl. As this control isn’t going to be added to the VisualTree on page, you need to call the Arrange and Measure methods on the UserControl in order to get it to render correctly.
Next the FrontTile is rendered to a new WriteableBitmap. Again, you need to call Invalidate in order to make sure the contents of the WriteableBitmap are correctly rendered when you save it to IsolatedStorage. You’ll notice that we’re using an EditableImage to facilitate saving the WriteableBitmap as a png. The code for the EditableImage and the corresponding PngEncoder can be downloaded from Joe Stegman’s blog. Note that this code uses an additional FromBitmapImage method that we’ve added to the EditableImage class. See end of this article for this code.
private void CreateClick(object sender, RoutedEventArgs e) {
    var td = new TileData() {
                        ImageFilename = filename,
                        Title = "My first live tile" };
    var ft = new FrontTile();
    ft.DataContext = td;
    ft.Arrange(new Rect(0, 0, 173, 173));
    ft.Measure(new Size(173, 173));

    var wbmp = new WriteableBitmap(ft, null);
    wbmp.Invalidate();

    var ei = EditableImage.FromBitmapImage(wbmp);
    var tileImage = "/Shared/ShellContent/" + filename.Replace(".jpg", ".png");
    using (var file = new IsolatedStorageFileStream(tileImage, FileMode.Create, FileAccess.Write,
                IsolatedStorageFile.GetUserStoreForApplication()))
    using (var strm = ei.GetStream()) {
        strm.CopyToStream(file);
    }

    var shellData = new StandardTileData() {
                            BackgroundImage = new Uri("isostore:" + tileImage, UriKind.Absolute)
                        };
    ShellTile.Create(new Uri("/MainPage.xaml?image=" + filename, UriKind.Relative), shellData);
}
In order for an image to be used as a background image for a Live Tile it must be 173px square in dimension and must be located in the /Shared/ShellContent folder in Isolated Storage. After the WriteableImage has been saved into Isolated Storage, the newly created file can be set as the BackgroundImage for a new ShellTile. The Create method requires an instance of the StandardTileData class, as well as the unique Uri that will be launched when the Tile is tapped by the user. In this case the Uri contains the page, MainPage.xaml, to be launched, and a query string parameter, image, which will be used to determine what image to display. The final piece to this process is to handle the query string parameter and display the corresponding image.
protected override void OnNavigatedTo(System.Windows.Navigation.NavigationEventArgs e) {
    base.OnNavigatedTo(e);

    string filename;
    if (NavigationContext.QueryString.TryGetValue("image", out filename)) {
        DisplayImage(filename);
    }
}
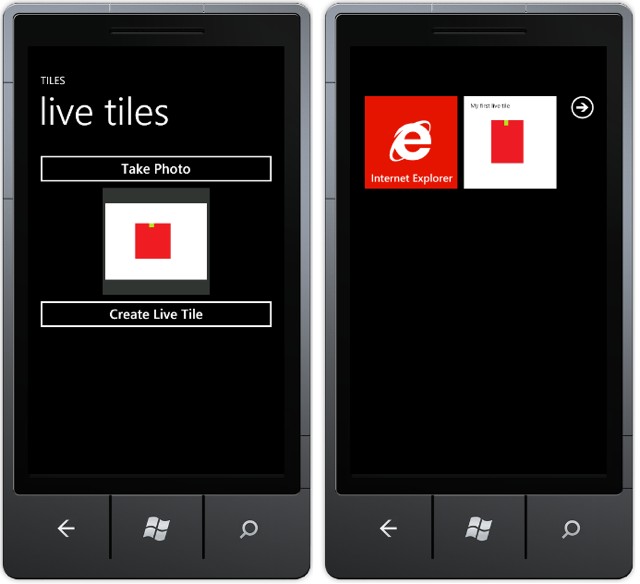
Figure 2 illustrates the application running with an image captured, and then a second image showing the Live Tile created when the user clicks the “Create Live Tile” button.

Lastly, here is the code added to the EditableImage class to generate an EditableImage from a WriteableBitmap.
public static EditableImage FromBitmapImage(WriteableBitmap source) {
    var ei = new EditableImage(source.PixelWidth, source.PixelHeight);
    for (int idx = 0; idx < source.PixelHeight; idx++)  {
        for (int jdx = 0; jdx < source.PixelWidth; jdx++) {
            var px = source.Pixels[idx * source.PixelWidth + jdx];
            var a = (byte)((px >> 24));
            var r = (byte)((px >> 16) & 0xff);
            var g = (byte)((px >> 8) & 0xff);
            var b = (byte)((px >> 0) & 0xff);

            ei.SetPixel(jdx, idx, r, g, b, a);
        }
    }
    return ei;
}
Nick is a software architect and developer with experience across a range of technologies, and has a particular interest in the future of rich client and mobile device applications. Nick is a speaker, author, a Microsoft MVP and owner of Built To Roam.


