Shutter speed in photography: basics for beginners.
Shutter speed is one of the most important settings in photography – alongside aperture and ISO. Learn the basics of shutter speed in photography and discover the creative opportunities it can offer..
What you’ll learn:
- What is shutter speed?
- Shutter speed fundamentals
- Shutter speed techniques
- Using Lightroom to master shutter speed
What is shutter speed?
Shutter speed is exactly what it sounds like – the speed at which the shutter of the camera closes. A fast shutter speed creates a shorter exposure — the amount of light the camera takes in —while a slow shutter speed gives the photographer a longer exposure.
The shutter is a curtain in front of the camera sensor that remains closed until you start shooting. Once you click the button to take a photo, the shutter opens and lets in light that passes through the lens, exposing the sensor to it. Then the shutter closes again. The length of time the shutter remains open is determined by its speed.
What does changing the shutter speed do?
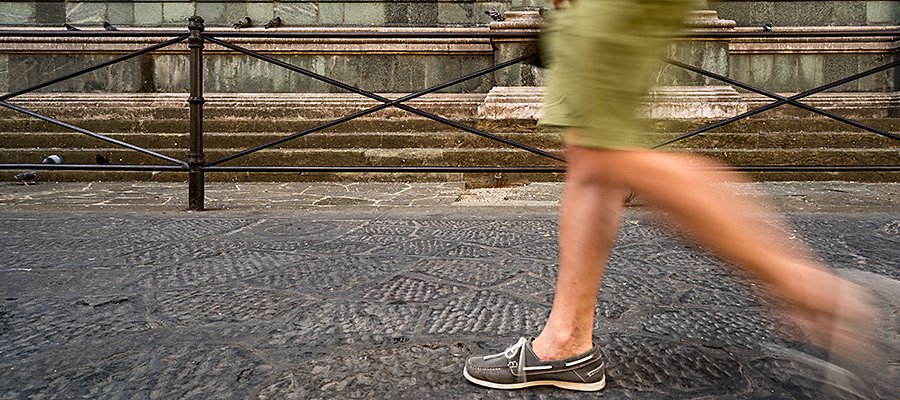
Shutter speed is used in photography to capture images with motion blur and to freeze movement. Most shutter speed examples include subjects which are moving – from wildlife photography to landscapes featuring motion, such as passing clouds or running waterfalls. To use it effectively when you’re out shooting in different settings with various subjects, you need to understand the difference between fast and slow shutter speed and the best techniques to achieve your desired results.
“Shutter speed gives you two things. One, it lets you freeze time. If you have a faster shutter speed, it’s going to open and close quickly and get that slice of whatever’s happening. Then there’s the instance where you want a really slow shutter speed that opens the aperture to let in more light. You can use slow shutter speed in a dimmer environment when you need more light to expose a shot correctly.”
Photographer Jeff Carlson
Shutter speed fundamentals.
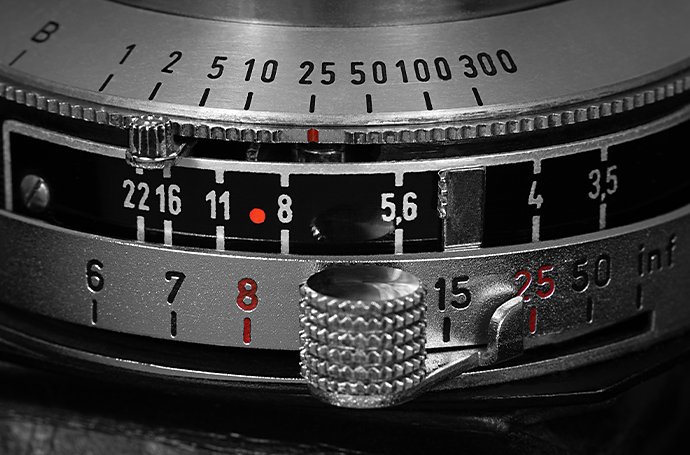
Shutter speed is measured in fractions of a second. Most modern DSLR cameras are capable of the fastest shutter speeds of up to 1/4000th of a second – some go up to 1/8000th. At the other end of the scale are the slowest shutter speeds. These are measured in whole seconds and generally fall anywhere between two and 30 seconds.
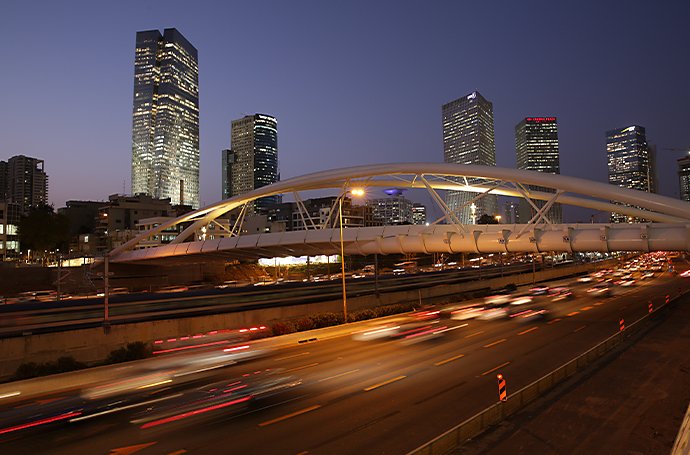
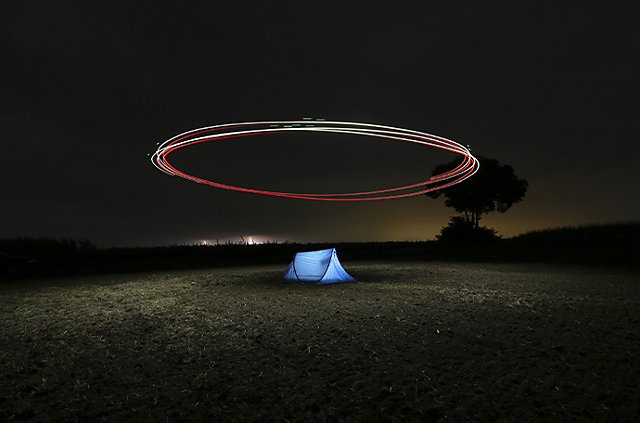
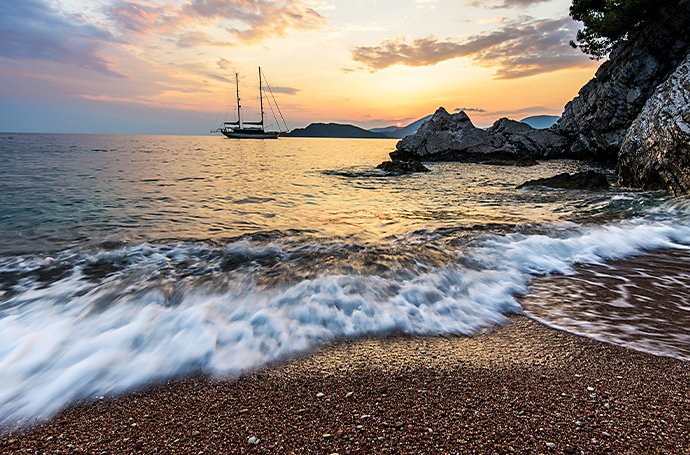
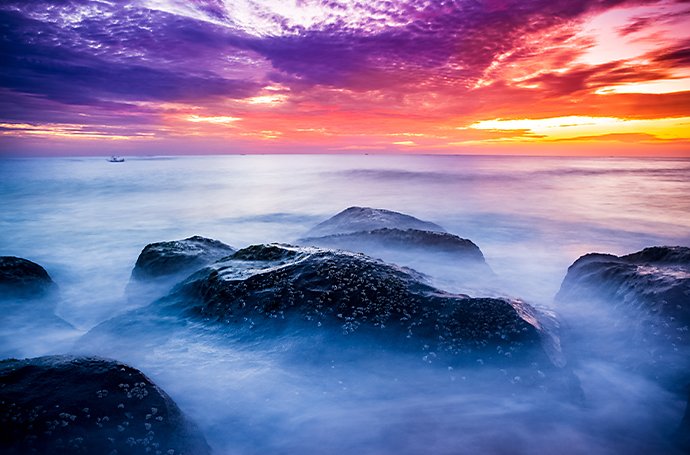
Fast shutter speeds of 1/4000th are used for capturing rapidly moving objects, such as freezing a race car hitting its top speed. The slower the shutter speed, the more motion blur your camera will capture when shooting fast-moving subjects. With long shutter speeds from two to 30 seconds, any movement in the image will blur. This can create a cool effect with landscapes and the sky, as water and clouds turn soft and streaky.
Key equipment for experimenting with shutter speed.
There are a few essential pieces of equipment you need when experimenting with shutter speed in photography:
- DSLR camera. Most DSLR cameras have the shortest shutter speed of 1/4000th of a second and longest ones of up to 30 seconds. To extend this, you need a camera with manual controls for the ISO, aperture and shutter speeds – not just automatic settings.
- Tripod. When shooting handheld action, a tripod can help to avoid any unwanted motion blur. Even if you want to capture the movement of a subject, you might not want other background elements or motion blur around the edge due to camera movement.
- Editing software. If your photos don’t turn out 100% as you envisioned, you can always edit them afterwards with the right photo editing software.
“You could have academic knowledge of how photography works. But you also need to have the practical knowledge of trying it and practising it all the time to put the two together.”
Photographer Carli Davidson
How to find shutter speed on your camera.
To find the shutter speed setting on your camera, read your instruction manual or try one of these methods:
1. While shutter speed is measured in fractions of a second, on most cameras it appears as a whole number. When it’s equal to or longer than one second you should see 1” (the quotation marks identifying a second). If it’s a fraction of a second – such as 1/250th – you should see 250. For example:
- 1” = shutter speed of 1 second.
- 10” = shutter speed of 10 seconds.
- 10 = shutter speed of 1/10th of a second.
- 500 = shutter speed of 1/500th of a second.
2. With most DSLRs, the shutter speed can be seen in the top left corner of the LCD display. If yours doesn’t have a screen, look through the viewfinder and it may appear in the bottom left. When you have neither, it should be on the back screen.
3. Do a manual check by:
- Setting the camera to ‘Aperture Priority’ mode.
- Turning ‘AUTO ISO’ off.
- Moving your camera between dark and light areas.
- Looking for the number that changes (this is your shutter speed).
How to set and change shutter speed.
Many cameras automatically set the shutter speed alongside aperture and ISO. This helps beginners get to grips with different shutter speeds without worrying about the other two aspects. Even professional photographers use the setting for ease when shooting in an environment where light changes quickly.
To change your camera’s shutter speed manually:
- Select ‘Shutter Priority’ mode. On the camera’s dial, this is usually indicated by an ‘S’ or ‘Tv’.
- Scroll through and choose the shutter speed you want.
- If your camera has an LCD display, the speed will normally appear here – or inside the viewfinder on the bottom or the side.
Alternatively, choose manual mode to adjust the aperture, ISO and shutter speed together.
It’s worth taking a few test shots to make sure you’re not introducing or freezing too much motion blur, depending on the effect you’re going for. This should inform whether you need to manually adjust it or not.
What is Shutter Priority?
Shutter Priority mode allows you to set and adjust shutter speed in photography. You’re likely to shoot in Shutter Priority mode in nature photography, when you can freeze a fast-moving animal on the ground or in the sky.

The difference between fast, slow and long shutter speeds.
With such a great range of shutter speeds, it’s important you choose the right one for what you’re shooting.
Fast shutter speeds, at 1/500th of a second or faster, will freeze and capture quick-moving action – so you get a clean image of a subject that would otherwise be blurred.


Lightroom vs Photoshop: which is best for you?
Discover the key differences between the apps so you can make the right choice and find the right plan.
Slow shutter speeds often refers to a larger fraction of a second, such as ½ or ¼. Slow shutter speeds can capture movement and introduce blur, usually for slower moving subjects.

Long shutter speeds are typically around one second or longer. Like slow shutter speeds, they can be used for adding blurring effects to images.
These general guidelines of the best shutter speeds for capturing different subjects can help you to get the right amount of motion blur or stillness for your images:
- 1/500th of a second and above. This fast shutter speed freezes all but the quickest objects in a frame. It’s ideal for snapping race cars, skateboarders, skiers and birds in flight.
- 1/100th to 1/500th. Perfect for freezing slow moving and posing humans, this shutter speed is best for wedding photos, portraits and pets (when they’re not running).
- 1/10th to 1/100th. Good for posing models, but ideally they need to be completely still. Using a tripod or framing a scenic shot with no movement can work well at these speeds.
- Two seconds to 1/10th. A tripod is necessary, as anything that moves will blur – best for calm landscape images.
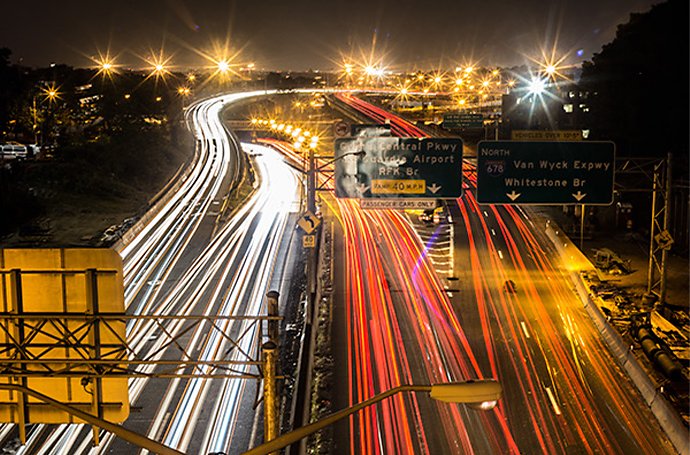
- Up to 30 seconds. This slow shutter speed is great for long exposure shots, where water and clouds turn silky and dreamlike, forming wonderful images. Any slight movement blurs.
“It goes back to your reason for taking the photograph. Are you wanting to capture motion or a split-second in time where something is moving but it doesn’t look like it? Like a rock falling into a pond, so you see that split-second where the water flies up into the air.”
Photographer and Designer Shawn Ingersoll
Shutter speed techniques.
When adjusting your camera’s shutter speed, consider light and motion. If you leave the shutter open for longer to capture more light, motion will affect the photo - potentially in ways you don’t like.
A slow shutter speed can illuminate a darker scene, as it brings more light through the lens. With a fast shutter speed, the lens is open for less time, so less light can enter. That makes low light a challenge and demonstrates the importance of a well-lit scene.
Properly setting your shutter speed is crucial to not missing the moment and retaining good light levels – especially with fast-moving subjects. Specific techniques can help you achieve the best results for both fast and slow shutter speed photos.
How to use a fast shutter speed.
A fast shutter speed is perfect for capturing a snapshot of action – whether that’s a bird in flight, a sports car speeding round a track or just your friend jumping over a fence.
Fast shutter speed eliminates, or at least reduces, the amount of blur around the subject during its movement. The shutter speed needs to match the speed of movement being captured, so the best setting varies depending on the subject.
Examples of how you can utilise a fast shutter speed are:
- Sports – usually at 1/500 or higher.
- Birds in your garden – at as fast a shutter speed as your camera can manage.
- Your dog playing fetch – 1/250 is normally fast enough.
Consider your subject and take shots at different shutter speeds where possible to work out the optimum speed.
Key technique: intentional blur.
Motion blur can be used creatively to blur certain elements in a frame to convey movement.
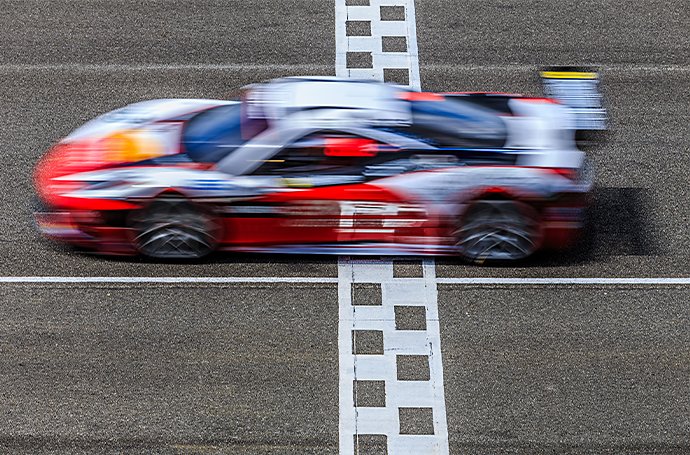
For example, a race car would look like it’s parked on the track if there was no blur whatsoever. Many photographers use a fast shutter speed that cleanly captures the car while blurring its tyres.
Intentionally blurring the background is another common effect to show movement or focus on the subject in the foreground. Panning is a popular technique to achieve this. Panning follows the movement with the shutter open to keep the subject sharp and the background blurred. When panning, slower shutter speeds of 1/60 to 1/30 are generally used.
“If I’m out at the race track and there’s a Formula One race car going by at 200 miles an hour, and I shoot it at 1/8000 of a second to perfectly freeze its motion, when I look at the final picture, it looks like a parked car. There’s going to be no sense of the reality of that scene. There’s going to be no sense that it was traveling quickly. If, instead, I use a slower shutter speed and time my camera to follow the car as it goes through the frame, the car is going to have a little bit of blur, but the background is going to be totally smeared — it’s going to look like [the car] was going 200 miles an hour. That’s a creative choice I get to make at the time to impart a greater sense of the true reality in the scene.”
Photographer Ben Long
Find out how to add motion blur effects to your images.
How to use a slow shutter speed.
Capturing action that goes beyond a single moment is possible with slow shutter speeds. It’s often used to conjure up creative effects when shooting landscapes and other subjects featuring water and clouds.
For that silky-smooth effect at the bottom of a waterfall or waves crashing against a coastline, slow shutter speeds are best at:
- 1/8 to 12 seconds – to add a slight sense of movement.
- 15 to 30 seconds – to blur the water movement completely.
- 30 seconds+ – to smooth out the moving water.
Slow shutter speed photography is also a common technique when shooting at night, as it lets more light into the lens, even if your subject is moving. Experiment with the speed, aperture and ISO settings to get your desired results.
Key technique: camera shake.
Even with a slow shutter speed, you can get unwanted motion blur due to camera shake – that’s because the whole camera moves when the shutter is open. Using a tripod will avoid this, but sometimes you need to shoot handheld.
In this case, avoid using a shutter speed slower than your lens length. For example, if your camera has a 300mm lens, use a shutter speed of at least 1/300 – unless you have a tripod. Basically, the longer your lens, the faster your shutter speed should be.
“I used to photograph basketball in this dark gym. To get the proper exposure, I would sometimes have to go down to a shutter speed of 1/50, but then I could see movement in my images, which I didn’t want. In sports photography, you want images to be clean.”
Journalist and Wedding Photographer Anna Goellner
Using Lightroom to master shutter speed.
Capture and edit photos on the go and in one place with Lightroom. You can quickly see if your techniques using fast and slow shutter speeds worked, editing them as you go. Explore images and tutorials from professional photographers to improve your own techniques when experimenting with shutter speeds.
Discover more inspiring fast and slow shutter speed creations on Behance.
Discover Adobe Lightroom and create professional images when using fast and slow shutter speeds.
Contributors
Do more with Adobe Photoshop Lightroom.
Edit photos easily with Lightroom presets, Super Resolution, easily share photos from any device and access your projects anywhere with cloud photo storage management.
You might also be interested in…

Discover how adjusting shutter speed can help you capture clean shots or motion-filled moments.

Discover ways to select the ideal focal length for any and every photo.

Night Photography.
Low light doesn’t have to equal low quality with these tips for successful nighttime photos.

An introduction to shallow depth of field.
Explore how shallow depth of field can add dimension to your photographs.
Get Photoshop Lightroom.
Edit, organise, store and share photos from anywhere.
7 days free, then £9.98/mo.