


Guide to Slow Shutter Speed Photography
How can you use slow shutter speeds to improve your photography and get creative results? That's what we'll find out in this guide. Read on!
Learn | Photography Guides | By Greg Cromie
In this guide to slow shutter speed photography, we’re going to cover simple ways to slow your process down for stunning results.
It’s an ingrained concept that in photography we must keep everything completely still and frozen to capture a scene, by using a fast shutter speed.
Sometimes, it can be tough to challenge yourself to slow down your shutter speed and capture motion.
Fortunately, there’s a lot to be gained from slow shutter speeds in your creative photography.
Let’s take a look at this exciting technique.
What Is a Slow Shutter Speed?
Cameras have functions that allow light to enter the lens and hit the image sensor, which in turn processes this information into a digital image.
Shutter speed is the camera setting that determines how long the camera shutter remains open to expose the sensor. This is known as a long exposure for slower speeds (i.e. slower shutter speed photography) and a short exposure for faster speeds (i.e. high shutter speed photography).
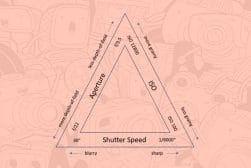
Shutter speed works harmoniously with aperture – i.e. how wide the lens diaphragm will open – and ISO – how much light sensitivity appears at the time of taking the image.
When you set your camera to Auto, the camera increases the shutter speed when you’re photographing a bright scene. It knows to expose the sensor for a short period to minimise the light. In darker scenes, it automatically slows the shutter speed to allow more light to hit the sensor.
Cameras only need a fraction of a second of light to capture an image. A slow shutter is 1/10 of a second while a fast shutter is 1/2000 of a second.
Optionally, you can manually control the shutter speed settings along with aperture and ISO.
It’s crucial to remember that the darker the situation, the slower the shutter speed. When there’s less light, you need to give the sensor more time to capture the image.
Another aspect of slow shutter speed is that you can capture motion. With fast shutter speeds, people freeze mid-stride, or a bird hangs frozen in the air.
Slowing the shutter speed down, the edges of your moving subjects blur. It goes a long way to represent movement, direction or even urgency.
How Do I Find My Shutter Speed?

Shutter speed is adjustable on the camera body and/or within the camera’s menus.
Modern DSLRs like those from Canon and Nikon have a command dial with a Shutter Priority setting – see more common camera parts.
On Canon cameras, the setting is TV for Time Value. On a Nikon DSLR, the Shutter Priority Mode is an S on the main control dial. Even current smartphone cameras have the option to change the shutter speed.
Once you’ve selected shutter priority, you use a sub-dial to control the shutter speed.
Manually changing the shutter speed results in the camera automatically adjusting ISO and aperture to deliver a well-exposed image.
One potential downside of this is that changing the aperture can have a dramatic impact on your composition as you may lose your desired depth of field (i.e., your out-of-focus elements).
The solution is to change your command dial to M for Manual. In manual, you dial-in the Shutter Speed and Aperture, and while the camera may warn you of an exposure issue, the rest is up to you.
Fujifilm mirrorless cameras feature a dedicated shutter speed dial with the incremental shutter speed settings on the top – see above image for an example.
Depending on the scenario, manually slowing the shutter speed results in a couple of things.
How Much Do You REALLY Know About Photography?! 🤔
Test your photography knowledge with this quick quiz!
See how much you really know about photography...

To gain correct exposure, you need to carefully manage the aperture and the ISO. When the sensor is exposed for longer, more light will hit it. If you don’t control the aperture and ISO your images will be overexposed.
Slower shutter speeds will mean you can dial the ISO down. You may also have to reduce the aperture of the lens to reduce the amount of light coming in.
Just remember: the smaller the aperture, the less depth of field you can achieve.
It’s a tricky balance, but with greater practice and experimentation, you can master these critical functions of your camera.
What Is the Best Slow Shutter Speed to Use?
There’s no hard and fast rule for what the best slow shutter speed is.
The reason for this is that every situation presents different challenges. And those challenges include the amount of available light and the purpose of your composition.
Typical shutter speeds for everyday photos, in a well-lit environment, are around 1/60 or 1/125 of a second – this is with subjects that are mostly still.
Increase the lighting in that scenario, and you’ll increase the shutter speed to 1/250. Get your subjects moving at a fast pace in a bright scene and push it up to 1/500 of a second.
At the other end, your typical photo in a darker room requires you to drop the shutter to 1/60 or 1/30 – allowing more light to correct the exposure. But if your subjects are moving, the amount of blur in the image will increase.
There’s no easy answer to the question of what is the best slow shutter speed. Fortunately, it’s a learning curve that’s not too steep, and with practice and patience, you can get the hang of it.
If you’re sitting at home on the couch, grab your camera and photograph your family as they go about their business. Later on, review the images and the shutter speed settings – learn from those findings.
Once familiar with the auto process, move to manual mode and play with aperture and ISO too.
How to Get Creative With Slow Shutter Speeds
The examples of creative exposures we’ll cover will provide you with a starting point to get creative with slow shutter speeds.
It’s amazing the sort of results you can get by adding a sense of motion to your frame.
1. Motion Blur
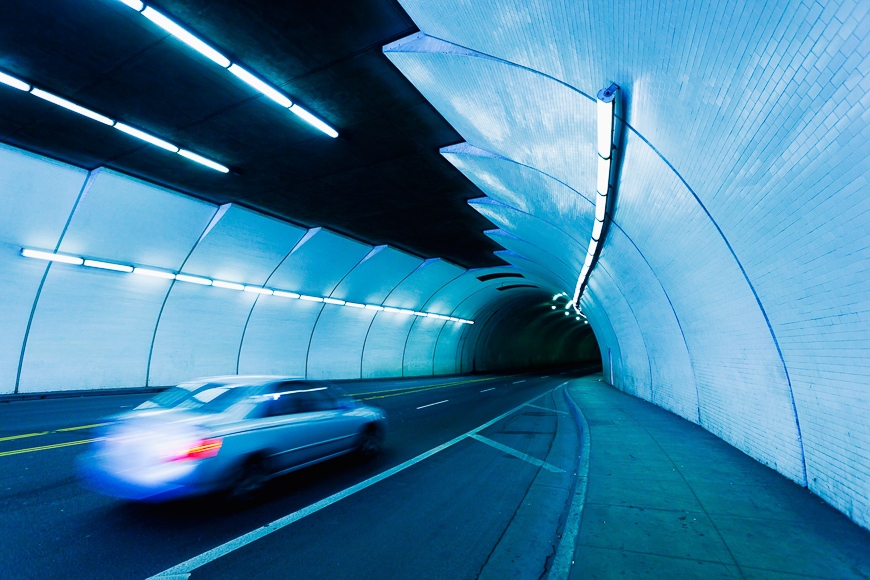
Slowing down your shutter speed delivers motion blur. Use it to your advantage and create exciting and dynamic photos where movement tells part of the story.
For example, a street scene can look impressive with everything frozen in time. Create a little motion blur, and all of a sudden people, cars or a flight of pigeons appear to be moving.
Employ motion blur in landscape shots where swaying trees or passing clouds can indicate weather patterns and motion.
The best settings are going to take trial and error. Starting at around 1/30 and gradually slowing down to 1/15 or 1/10 of a second will deliver beautiful motion blur.
Remember that you need either image stabilisation or a tripod for best results. Not got either? Fake some blur in Photoshop.
2. Intentional Camera Shake
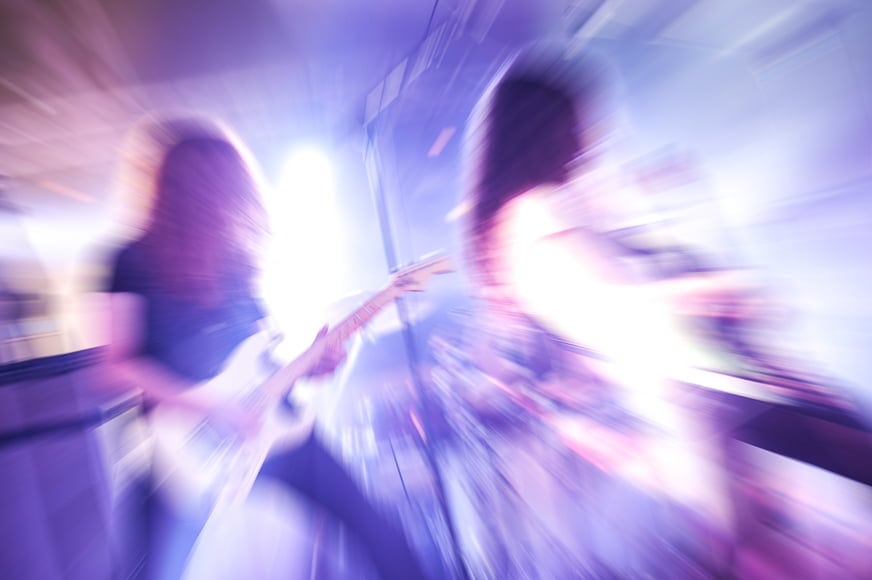
Intentional camera shake is a lot like capturing motion blur images. The difference is that instead of your subject moving, you move the camera. This is sometimes referred to as kinetic movement.
Planned camera shake delivers dynamic and energised images and is achieved by moving the camera quickly towards or away from the subject. Remember you only have a fraction of a second to make the motion.
You can also achieve this look as by zooming a lens in or out while triggering the shutter. Images appear to be moving in on a subject.
Be sure to turn off image stabilisation and practice with these techniques at around 1/15 of a second.
3. Panning For Gold

Panning your camera on a horizontal path is challenging, but the outcomes are rewarding – see our guide to panning photography ideas.
Like motion blur, you’re trying to capture a subject appearing to move. But with panning, you want to track the image as it travels so that it’s in full focus with only the background blurred.
Try photographing cyclists or cars traveling along a path in front of you. Keep your arms locked and swivel your body at the hips – a bit like a tripod.
Start with a shutter speed of 1/30 of a second and release your shutter as you start panning.
The trick is to keep your body movement at the same speed as the moving subject.
4. Light Painting
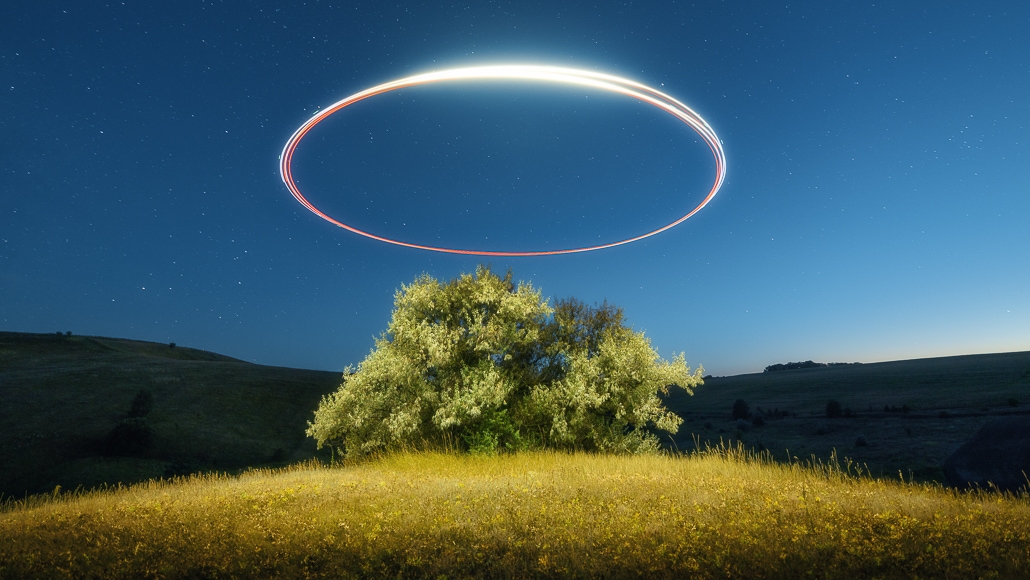
Light painting is a fun and creative way to use slower speeds at night.
Set your camera on a tripod and dial your shutter speed for a more extended period. Now, you can move in front of the camera with an illuminated object. The camera sensor will record every movement against a perfectly still and dark background.
The images show the trail created by the illuminated object for the duration of the exposure. You can safely achieve light painting with a torch, LED wand or headlamp.
For the more daring, you can use fire sticks, sparklers or set a clump of steel wool on fire and spin it on a thread. The results are mesmerising – see our guide to steel wool photography here.
Practice light painting by photographing car light trains as they move down a street. Ensure your shutter speed is slow enough to capture the path – start with 5 – 10 seconds.
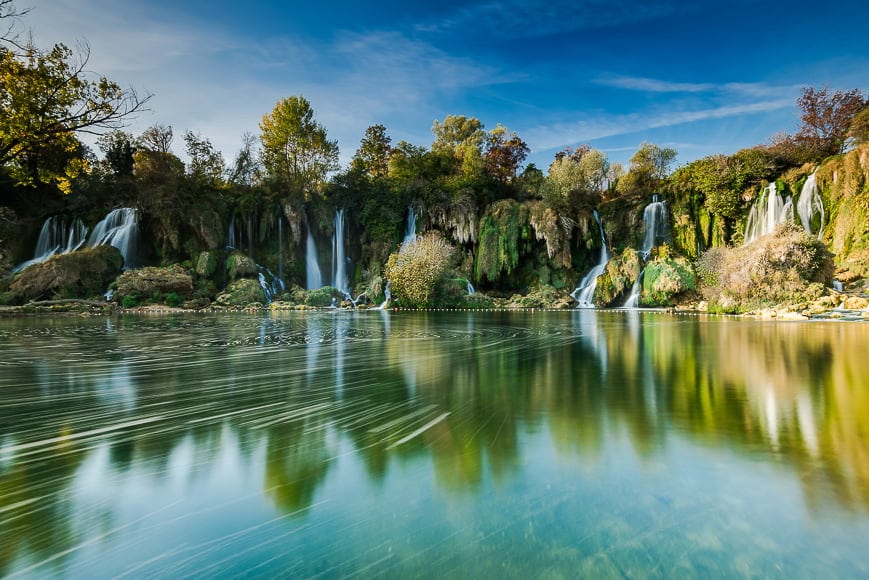
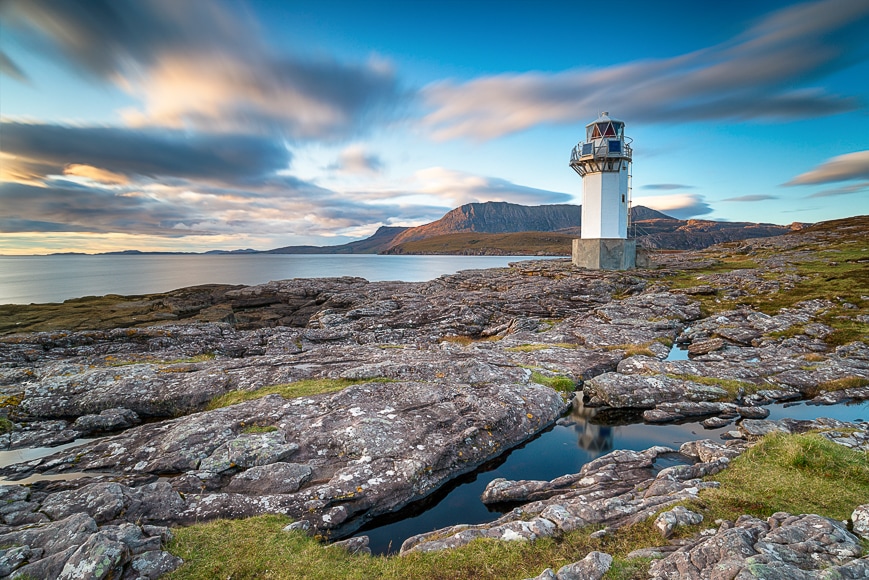
5. Flowing Water & Clouds

It’s incredible what a slower shutter speed can achieve when photographing natural elements such as moving water or scudding clouds.
Slowing the shutter down adds a sense of motion in the clouds. Rather than being still, they spread and create leading lines (see examples) – especially if they’re moving away from you.
Slower shutter speeds turn a typical waterfall shot into a magical composition – the water blends to form long flowing ribbons of white.
A flowing stream makes a dynamic centrepiece in a landscape shot. With a slower speed, the ripples in the water smooth out. Ideally, reduce the speed down to 1/15 of a second.
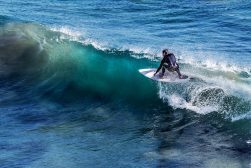
Another excellent water shot is of a continually surging shorefront with choppy waves.
Slowing the shutter speed right down makes the choppiness disappear and is replaces by a moody mist. In these cases, you should start with 1 second and then attempt longer exposures.
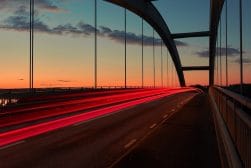
6. Long Exposure During The Day
We’ve already covered some of the scenarios using long exposure during the day – street scenes, panning and landscapes. But long exposures during the day are always at risk of delivering overexposed images.
The longer you expose the shutter to daylight, the more blown out your image will be. To combat this, carefully manage your shutter speed, use a narrow aperture, and keep ISO as low as possible.
You can also apply a filter to your lens that reduces the amount of light hitting the camera sensor. With this, you achieve the look of slow speeds and get a correctly exposed image.
7. Long Exposure During The Night

Long exposures at night are a little trickier as there’s very little light to capture an image.
There are many applications for longer exposure at night – such as light painting. But one of the more fascinating forms of prolonged exposure is astrophotography.
With the right conditions and shutter speeds that are minutes or hours long, you’ll capture star trails and the galactic core of the milky way.
It takes a lot of prep and practice, so be sure to check out our guide to astrophotography.
Recommended Gear for Long Exposure Photography
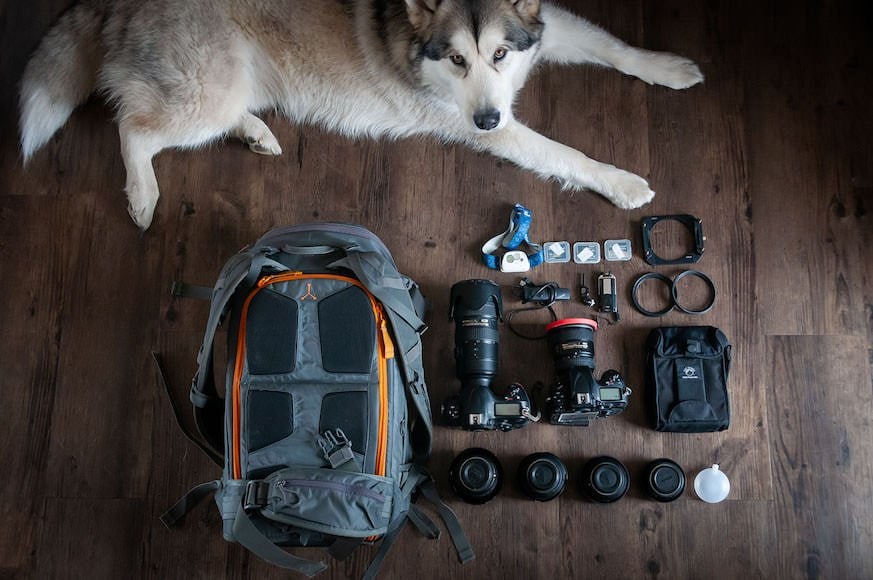
Landscape Photography gear of Victoria Haack on Shotkit.
You can simply pick up your camera, dial-in a long shutter speed and go to town taking photos. But as we’ve discovered, the laws of photography don’t always comply with creating a correct exposure.
There are some straightforward and cost-effective solutions to aid you in your long exposure photography.
-
Image Stabilisation
Some digital cameras and lenses feature image stabilisation – an electronic or mechanical built-in feature that picks up camera shake and corrects it.
With it, a considerably slower shutter speed is possible. In addition, shooting by hand can be achieved without blurred results.
You’ll achieve much slower hand-held shutter speeds than with a camera that lacks stabilisation.
-
Tripod
As we’ve discussed, slower speeds result in blurry images. You may want to achieve this look, but otherwise, it’s annoying.
A tripod is a purpose-built device that supports your camera during this kind of work.
Tripods are designed to keep your camera still and are useful for fast and smooth panning. Tripods have a ‘head’ that can be panned and tilted in various directions to support your creative endeavours.
You can also get tripods for your phone.
-
Remote Shutter / Self Timer
With unusually slow shutter speeds, any movement in the camera ruins your photos.
A simple way to avoid camera shake is to not touch your camera. Cameras have a self-timer with a delay of 2, 5 or 10 seconds.
This grants you the freedom to set everything up, press the button and step away from the camera.
Alternatively, use a wired or wireless remote shutter release. These devices replicate the action of the shutter button without having to touch the camera.
-
ND Filters
Slow shutter work during the day can result in overexposed images. To combat this, add an ND or Neutral Density filter to the front of the lens.
These come in a range of strengths to filter out the light. Variable filters allow you to turn the front of the filter to change the power of the filtration.
What’s the best ND filter to buy? This depends on several factors, but we prefer using variable ND filters for their convenience.
Slow Shutter Speed Photography FAQs
What is slow shutter speed in photography?
Slow shutter speed means your camera’s shutter stays open for longer, thus exposing the sensor for a greater period of time. With a slow shutter speed, you capture movement in the scene, as well as allowing more light to enter.
How do I take a picture with a slow shutter speed?
First, set your camera up on a tripod (otherwise the camera shake will be evident). For the crispest possible shot, you can also use a remote shutter release. Then, set your camera to manual or Shutter Priority mode. Select a slow shutter speed (e.g. 1/10 of a second) and fire away.
What is an example of slow shutter speed?
Once you dip below 1/100, you’re entering into what might be considered slow shutter speed territory. So 1/30, 1 second, 20 seconds – these are all examples of slow shutter speeds.
Final Words
There are a number of reasons why you’d want to extend your exposure time by using slow shutter speed photography – some of them creatively driven, and some related to simply letting enough light in to get a well-exposed shot.
Regardless of your motivations, understanding how to control your shutter for different effects will help you get the results you want in your photography.
Leave any questions below in the comments and I’ll do my best to get back to you.

Check out these 8 essential tools to help you succeed as a professional photographer.
Includes limited-time discounts.


I’m a Melbourne-based street photographer and blogger. I love to travel to Japan to photograph and document its dynamic people and culture.


