This tutorial will guide you through setting up PHP on your IIS 7.5 server.
Time to complete: ~15 minutes
Requirements: Working installation of IIS 7.5.
1. Download PHP
You can get the PHP binaries from http://windows.php.net/download/.
You will need the VC9 x86 non thread safe version in the ZIP format.
2. Unpack PHP
Once you have downloaded PHP, un-zip the package to a location of your choice.
The recommended location is c:\php5\ but in this installation example we’ll be using d:\php5\.
3. Install the C++ Runtime
PHP is compiled using the Visual Studio Compiler so we must install the C++ Runtime in order for PHP to work.
If you do not do this step, you will get an Error 500 from the fast-cgi module and PHP will not work.
– Browse to http://windows.php.net/.
– On the left side, select the download link for Microsoft 2008 C++ Runtime (x86) (link working at time of posting).
– Run the installer and follow the on screen instructions..
4. Install the CGI module in IIS
The CGI module is necessary for PHP to run. By default this isn’t installed so we will need to do this before we can proceed.
Depending on the version of Windows you are running the procedure is slightly different, so you will need to choose from one of the two methods below.
Windows Server 2008 and 2008 R2
– Navigate to Start\Control Panel\All Control Panel Items\Administrative Tools and open Server Manager.
– In the left hand side there is a tree of services, navigate to Roles > Web Server (IIS).
– Scroll down until you see Role Services.
– Select Add Role Services.
– Find Application Delevopment and then CGI and select the tickbox.

– Click Next and then Install
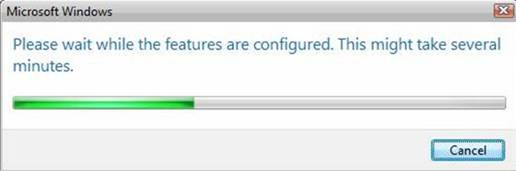
– When it has finished, you may need to restart IIS or the computer. Do this if requested.
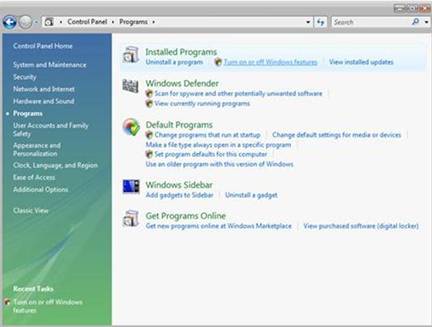
Windows Vista/7
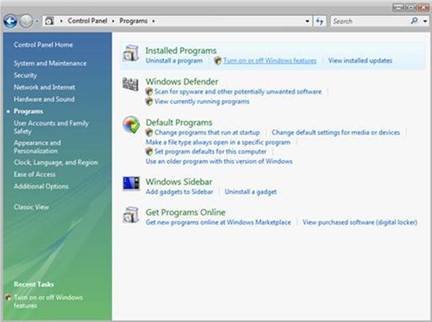
– Navigate to Start\Control Panel and open Programs and Features.
– On the left select Turn Windows features on or off.
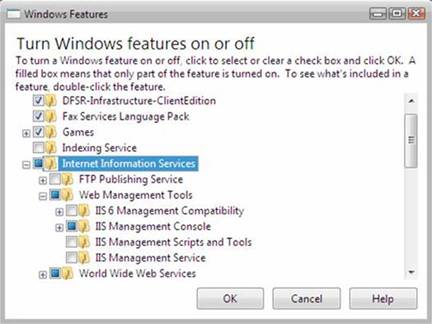
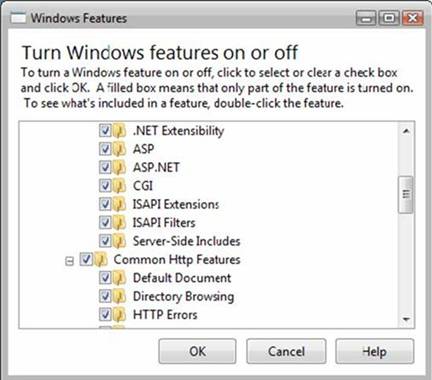
– In the tree of services, navigate to Internet Information Services\World Wide Web Services\Application Development Features and then select CGI.

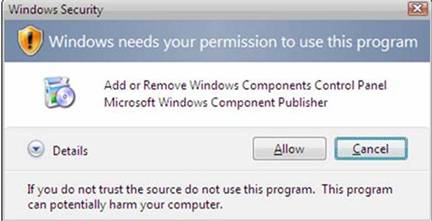
– Click OK to start the installation.
– When it has finished, you may need to restart IIS or the computer. Do this if requested.
5. Installing PHP
We that we have the necessary roles we can now install PHP.
– Load up the IIS Manager by going to Control Panel\All Control Panel Items\Administrative Tools and opening Internet Information Services (IIS) Manager.
– In the folder tree on the left select your server, then select the site you want to add PHP to.
– In the icon view, select Handler Mappings.
– On the right, select Add Module Mapping.
– Fill out the fields as below:
Request Path: *.php
Module: FastCgiModule
Executable: d:\php5\php-cgi.exe Remember to enter the path you un-zipped PHP to.
Name: php5 You can select any name you wish.
– Now click the button Request Restrictions…
– On the Mapping Tab click the check box and then select File.

– Click OK twice and the module is now installed.
6. Adding an index file/default document for PHP
An index file/default document is the file that is first called automatically when you visit a folder. For example visiting http://www.iisunderground.com will automatically invoke index.php from the root folder. We need to tell IIS what we want to use as this file.
– On the left of the IIS Manager, select the site we are working on again to return to the page of icons.
– From here select Default Document.
– On the right click Add.
– In the box, enter index.php
– Click OK and the index file/default document is now added.
You can feel free to add more here later if you want to use something other than index.php as your default file.
7. Testing our installation
To make sure the install has worked, we need to create a test PHP file.
– Create a new file in the folder you have stored your websites files in.
– Name it test.php
– Inside it, put the following code:
<?php
 phpinfo();
?>
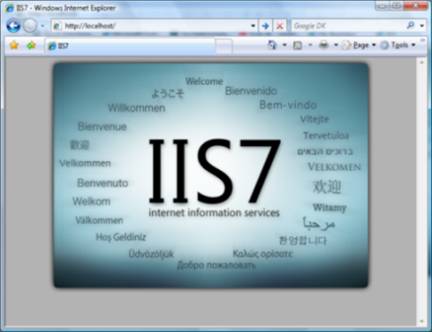
– Save it and then visit the URL to test.php and you should get something like this:

If you see something similar to that then congratulations, PHP is working! If not, go back and follow each step again to see where you went wrong. If you still have problems, drop us a line on our Facebook page.
Now you need go and learn about configuring your php.ini file to secure your server from malicious attacks on your scripts.
Finished.
Microsoft Says:
Install and Configure PHP
By Tali Smith
November 15, 2009
Introduction
The fastest and easiest way to install PHP on Internet Information Services (IIS) is by using the Microsoft® Web Platform Installer (Web PI). Web PI completely automates setting up IIS, FastCGI, and the latest version of PHP from the php.net Web site. With Web PI, you can navigate to the “Web Platform” tab and select “PHP” under “Framework and Runtimes” customize link. Alternately, use the instructions that follow as guidance for installing PHP with Windows® Installer or using a compressed (Zip) file installation.
There are two builds for each PHP version: one is thread-safe, and one is not (referred to as the non-thread-safe [NTS] version). The thread-safe version is designed for environments where the Web server core can keep the PHP engine in memory, running multiple treads of execution for different Web requests simultaneously. The architecture of IIS and the FastCGI extension provide an isolation model that keeps requests separate, removing the need for a thread-safe version. The NTS version does not have any of the code that allows PHP to manage multiple threads. As a result, there is a performance improvement on IIS when using the NTS version when compared to the tread-safe version because the NTS version avoids unnecessary thread-safety checks (FastCGI ensures a single-threaded execution environment).
Install PHP
There are two main ways to install PHP on a Windows®-based computer: download the Windows Installer or use the Windows Zip file from the PHP Web site. Either method will get PHP working, but both have some extra steps that are needed to make PHP work well.
Windows Installer
The Windows Installer version can get a complete PHP environment up and running, but the installation of extensions can be confusing. By default, no extensions are installed, and this can adversely affect the usefulness of the PHP installation. Alternately, all of the extensions can be installed; this results in an unstable system because some of the extensions can conflict with others. It is generally easier to use the Zip file installation.
Zip File Installation
To use the Zip file installation, follow the instructions in Using FastCGI to Host PHP Applications on IIS 7.0 and Above. The Zip file installation installs many of the extensions that are available for the Windows Installer version; however, none of the extensions are enabled until their entries in the Php.ini file are set up.
1. Download the latest non-thread-safe Zip file package with binaries of PHP. Under Windows Binaries, click on the most current PHP non-thread-safe Zip package to download the PHP files.
2. Unpack the files to a directory of your choice (for example, C:\PHP) on your IIS server.
3. Rename the Php.ini-recommended to php.ini.
4. Open the Php.ini file in a text editor, then uncomment and modify settings as follows:
a. Set fastcgi.impersonate = 1.
FastCGI under IIS supports the ability to impersonate security tokens of the calling client. This allows IIS to define the security context that the request runs under.
b. Set cgi.fix_pathinfo=0
The cgi.fix_pathinfo provides PATH_INFO/PATH_TRANSLATED support for Common Gateway Interface (CGI). Setting this to 1 will cause PHP CGI to fix its paths to conform to the specification.
c. Set cgi.force_redirect = 0.
d. Set open_basedir to point to a folder or network path where the content of the Web site(s) is located.
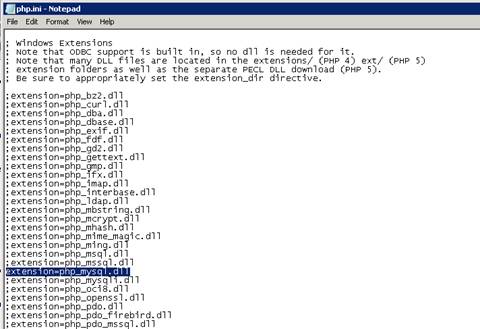
e. Set extension_dir to point to a location where PHP extensions reside. For PHP 5.2.X, this is typically extension_dir = “./ext” .
f. Set error_log=”C:php_errors.log”
This can help with troubleshooting.
g. Enable the required PHP extension by un-commenting corresponding lines. More information follows in the section, Extensions.

Figure 1 Windows extensions
5. Click on Start, Settings, Control Panel, and then double-click on the System icon (using the class view).
6. Click on the Advanced system settings link in the left column.
7. From the System Properties window, click on the Advanced tab, and then click on the Environment Variables button at the bottom.
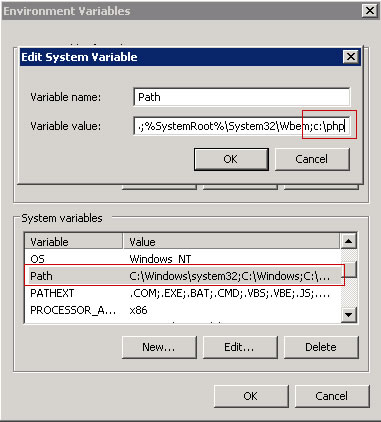
8. Select the Path variable from the System Variables section, and then click on Edit. Add: c:\php to your system path.

Figure 2: Edit System Variable
9. Click OK until you have exited the System Properties window.
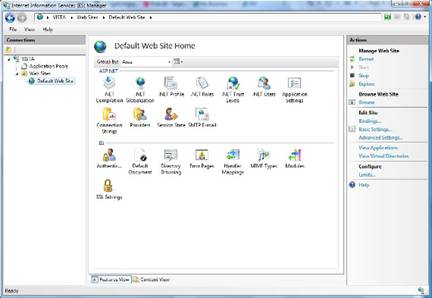
10. Start IIS Manager by clicking on Start, Programs, Administrative Tools, and then Internet Information Services (IIS) Manager.
11. From the IIS Manager, click on the hostname of your server in the Connections panel on the left.
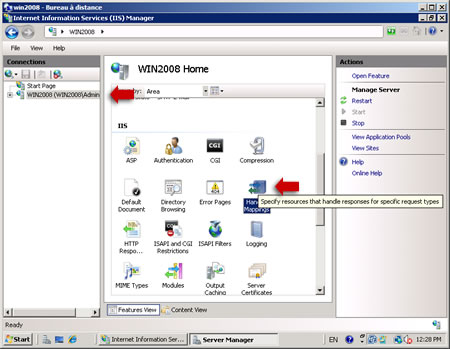
12. Double-click on the Handler Mappings icon.

Figure 3: Internet Information Services (IIS) Manager
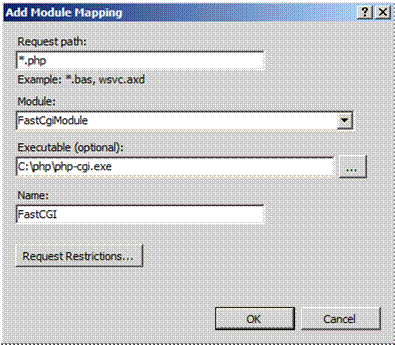
13. From the Handler Mappings Actions panel, click on Add Module Mapping.

Figure 4: Handler Mappings
14. Type the following information into the appropriate text boxes, and then click OK.
- Request path: *.php
- Module: FastCGImodule
- Executable: C:\php\php-cgi.exe
- Name: FastCGI

Figure 5: Add Script Map
15. Click OK, and then click Yes.
16. In the left panel, click on your server’s hostname, and then double-click on the Default Document icon.
17. From the Actions panel on the right, click Add.
18. Enter index.php as the new default document name, and then click OK.
19. Enter default.php as the new default document name, and then click OK.
20. In the left panel, click on your server’s hostname.
21. In the Actions panel on the right, click Restart.
22. Create a new text document, and save it as c:\inetpub\wwwroot\phpinfo.php with the following content:
<?php phpinfo(); ?>
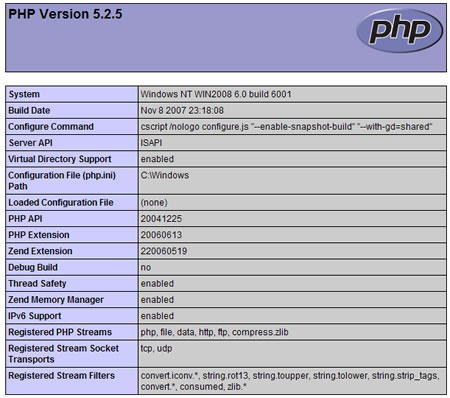
23. You should now see the PHP information page at http://localhost/phpinfo.php.

Figure 6: PHP information page
Extensions
It is important to determine which extensions are needed by the applications that will be running and then to limit the installed extensions to only those. For a typical open-source application installation, for example, the following extensions are installed:
- Database Extensions—Most open-source applications that use MySQL for a database engine use either the php_mysql or the php_mysqli extensions. For new development work, either of these extensions work well, or consider using the PDO versions of the MySQL driver (PDO is a PHP extension providing a data-access abstraction layer that can be used with a variety of databases); this extra layer of abstraction provides a richer set of object database functionality and controls. If Microsoft® SQL Server® (or an express version, such as Microsoft® SQL Server® 2008 Express or Microsoft® SQL Server® 2005 Express Edition) is the database engine, use the php_mssql extension for open-source applications. For new development work, use the PDO version of the SQL driver.
- Image Handling Extensions—Many of the open-source applications that enable work with images make use of the GD2 extension – php_gd2, which has a number of good basic image manipulation application programming interfaces (APIs). Some applications use the ImageMagick application and libraries. There is also a php_exif library for working with the extended information that modern digital cameras store within the images.
- Internationalization and Localization Extensions—The two most commonly used extensions for i18n and l10n are php_mbstring (Multi-Byte String) and php_gettext (Native Language Support). Many of the open-source applications use one or both of these.
- Web Services Extensions—Choose the Web services extensions based on the services desired. For PHP, the SOAP extension is widely used. The XML-RPC extension is often used in conjunction with SOAP and other services.
PHP.INI File Settings
The Php.ini file provides PHP with configuration and environmental information. Below are a number of settings for the Php.ini file that help PHP work better with Windows.
Required Settings:
- extension_dir = <PATH TO EXTENSIONS>
The extension_dir needs to point to the directory where the PHP extensions are stored. The path can be fully qualified (for example, C:\PHP\ext) or relative (for example, .\ext). Extensions that are specified lower in the Php.ini file need to be located in the extension_dir. If the extensions specified are not in the extension_dir, then PHP will give a warning message at the start of script execution, and the application may show errors because of the missing functionality.
- extension = xxxxxx.dll
For each extension enabled, a corresponding extension= directive that tells PHP which extensions in the extension_dir to load at startup time is necessary.
- log_errors=On
PHP errors can also go through the PHP error logging facility. This can be used to send errors to a file or to a service (for example, syslog) and works with the error_log directive described below. When running under IIS, log_errors must be enabled with a valid error_log. Otherwise, FastCGI considers any startup messages (which may be benign) as an error condition, which generates an HTTP 500 return error code to the browser.
- error_log=<path_to_error_log_file”
The error_log needs to specify the fully qualified, or relative, path to the file where the PHP error log is stored. This file needs to be writable for the IIS service. The most common places for this file are in various temporary directories (for example, C:\inetpub\temp\php-errors.log). That puts the log in a place that IIS can use, and also keeps the log close to where PHP applications are running.
- cgi.force_redirect = 0
This directive is required for running under IIS. It is a directory security facility required by many other Web servers; however, enabling it under IIS will cause the PHP engine to fail on Windows.
- cgi.fix_pathinfo = 1
This lets PHP access real path info following the CGI specification. The IIS FastCGI implementation needs this extension set.
- fastcgi.impersonate = 1
FastCGI under IIS supports the ability to impersonate security tokens of the calling client. This allows IIS to define the security context that the request runs under.
- fastcgi.logging = 0
FastCGI logging should be disabled on IIS. If it is left enabled, then any messages of any class are treated by FastCGI as error conditions, which will cause IIS to generate an HTTP 500 exception.
Optional Settings:
- max_execution_time=##
This directive sets the maximum amount of time that can be taken executing any given script. The default is 30 seconds. Some applications need more time to process batch operations (for example, Gallery2 loading multiple images from a remote location). However, setting the execution time higher than 300 seconds is not advised because there are often other parts of the connection that cannot support such a long execution time.
- memory_limit=###M
The amount of memory available for the PHP process (in MB). The default is 128 MB, which is appropriate for most PHP applications.
- display_errors=Off
This directive determines whether to include any error messages in the stream that it returns to the Web server. If turned on, PHP will send the classes of errors that are defined with the error_reporting directive back to IIS as part of the error stream. Many of the open-source applications bypass error reporting by executing commands prefaced with @. This allows the applications to control error handling.
- Mail functions
PHP is configured by default to send outbound mail through an SMTP server located on the same system as the Web server. Note that most Windows installations usually have the Web and mail servers on separate systems.
Enable PHP Session State
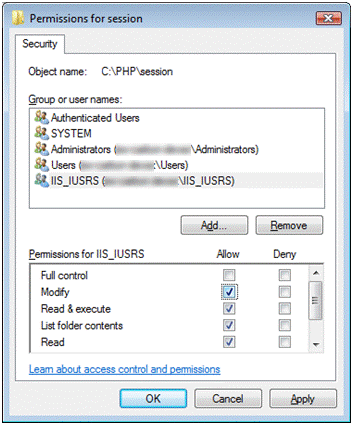
1. In Windows® Explorer, create the session subdirectory in the PHP installation directory.
2. Right-click the session directory, and select Properties.
3. In the Security tab, click Edit.
4. Click Add, and enter IIS_IUSRS for Enter the object names to select.
5. Click OK.
6. Select the Modify permission check box, and click OK.

Figure 7: Permissions for session folder
7. Click OK in the Session Properties window.
8. Open php.ini in the PHP installation directory, and set the session.save_path setting to the session subdirectory:
session.save_path = “C:\php\session”
9. Save and close the file.
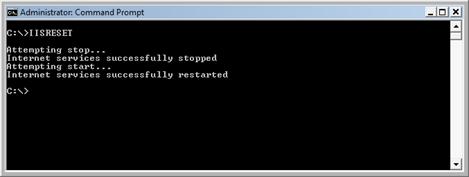
10. Click Start, and then select Command Prompt.
11. Type runas /user:administrator cmd.exe to enable elevated permissions.
12. Type iisreset at the command prompt, and then press the ENTER key.

Figure 8: IISRESET command
Note that PHP uses file-based session state by default. You can modify a number of additional session settings, including whether cookie or URL sessions should be used, and whether sessions are created on the first request or need to be explicitly created.
13. Test the session state by using Windows Explorer, navigate to C:\inetpub\wwwroot.
14. Create a folder and rename it phpapp.
15. Create session.php in the phpapp directory.
16. Paste the following into it:
<?php
session_start();
$counter = isset($_SESSION[‘counter’]) ? $_SESSION[‘counter’] : 0;
$counter++;
print “You have visited this page $counter times during this session”;
$_SESSION[‘counter’] = $counter;
?>
17. Save and close the file.
18. Start Internet Explorer, and navigate to http://localhost/session.php.

Figure 9: Using session state
19. Observe that the counter is 1.
20. Request http://localhost/session.php again, or press F5.

Figure 10: Using session state
21. Observe that the counter is 2.
Note: This article uses information from “Using FastCGI to Host PHP Applications on IIS 7.0 and Above” by Ruslan Yakushev, published on December 5, 2007.
If Not Then:
Assuming you’ve carried out steps 1 – 9 in the article you linked to and have your PHP files extracted to c:\php then complete the following steps using a cmd.exe command prompt:
Firstly we need to configure IIS Express and setup a handler for PHP
cd "\Program Files\IIS Express"

appcmd set config -section:system.webServer/fastCgi /+"[fullPath='C:\PHP\php-cgi.exe',arguments='',maxInstances='4',idleTimeout='300',activityTimeout='30',requestTimeout='90',queueLength='1000',instanceMaxRequests='200',protocol='NamedPipe',flushNamedPipe='False',rapidFailsPerMinute='10']" /commit:apphost

appcmd set config -section:system.webServer/handlers /+"[name='PHP-FastCGI',path='*.php',modules='FastCgiModule',verb='*', scriptProcessor='c:\php\php-cgi.exe']" /commit:apphost
Assuming your PHP website resides in c:\MyPHPWeb we create a site in IIS Express that listens on http://localhost:32701:
appcmd add site /name:"MyPHPApp" /bindings:http/*:32701: /physicalPath:"c:\MyPHPWeb"
Next start the site:
iisexpress.exe /site:MyPHPApp
And finally browse to your PHP page:
http://localhost:32701/test.php