Generating 4K PBR Textures Using Stable Diffusion XL
I’m picking back up the work that I started last year building 3D scenes and sketches with Three.JS.
At that time, it was just after AI image generators like DALL-E and Stable Diffusion were really taking off. I had success running Stable Diffusion locally and using it to generate textures for terrain, buildings, and other environments in the 3D worlds I was building.
I was using Stable Diffusion v1 back then. I had found some prompts that I liked which created images with styles kind of like this: 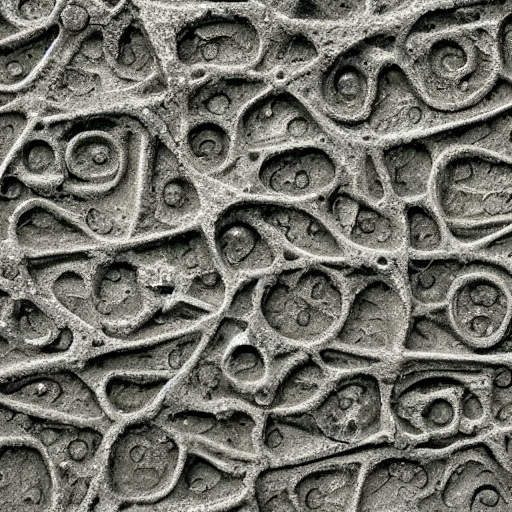
SDv1 was very good at generating textures like this, and I generated hundreds/thousands of images while playing around with different prompts.
It is now August 2023, and the AI image generation ecosystem has continued to improve by leaps and bounds. I’ve been trying out Stable Diffusion XL for texture generation, starting out with mostly terrain, and I’ve been getting some great results.
At first, I was getting some discouraging results since the prompts I was using before weren’t working very well. However, after some experimentation, I’ve been able to get results that are way better than anything I’d accomplished in the past.
Stable Diffusion XL v1.0 PBR Texture Generation Workflow⌗
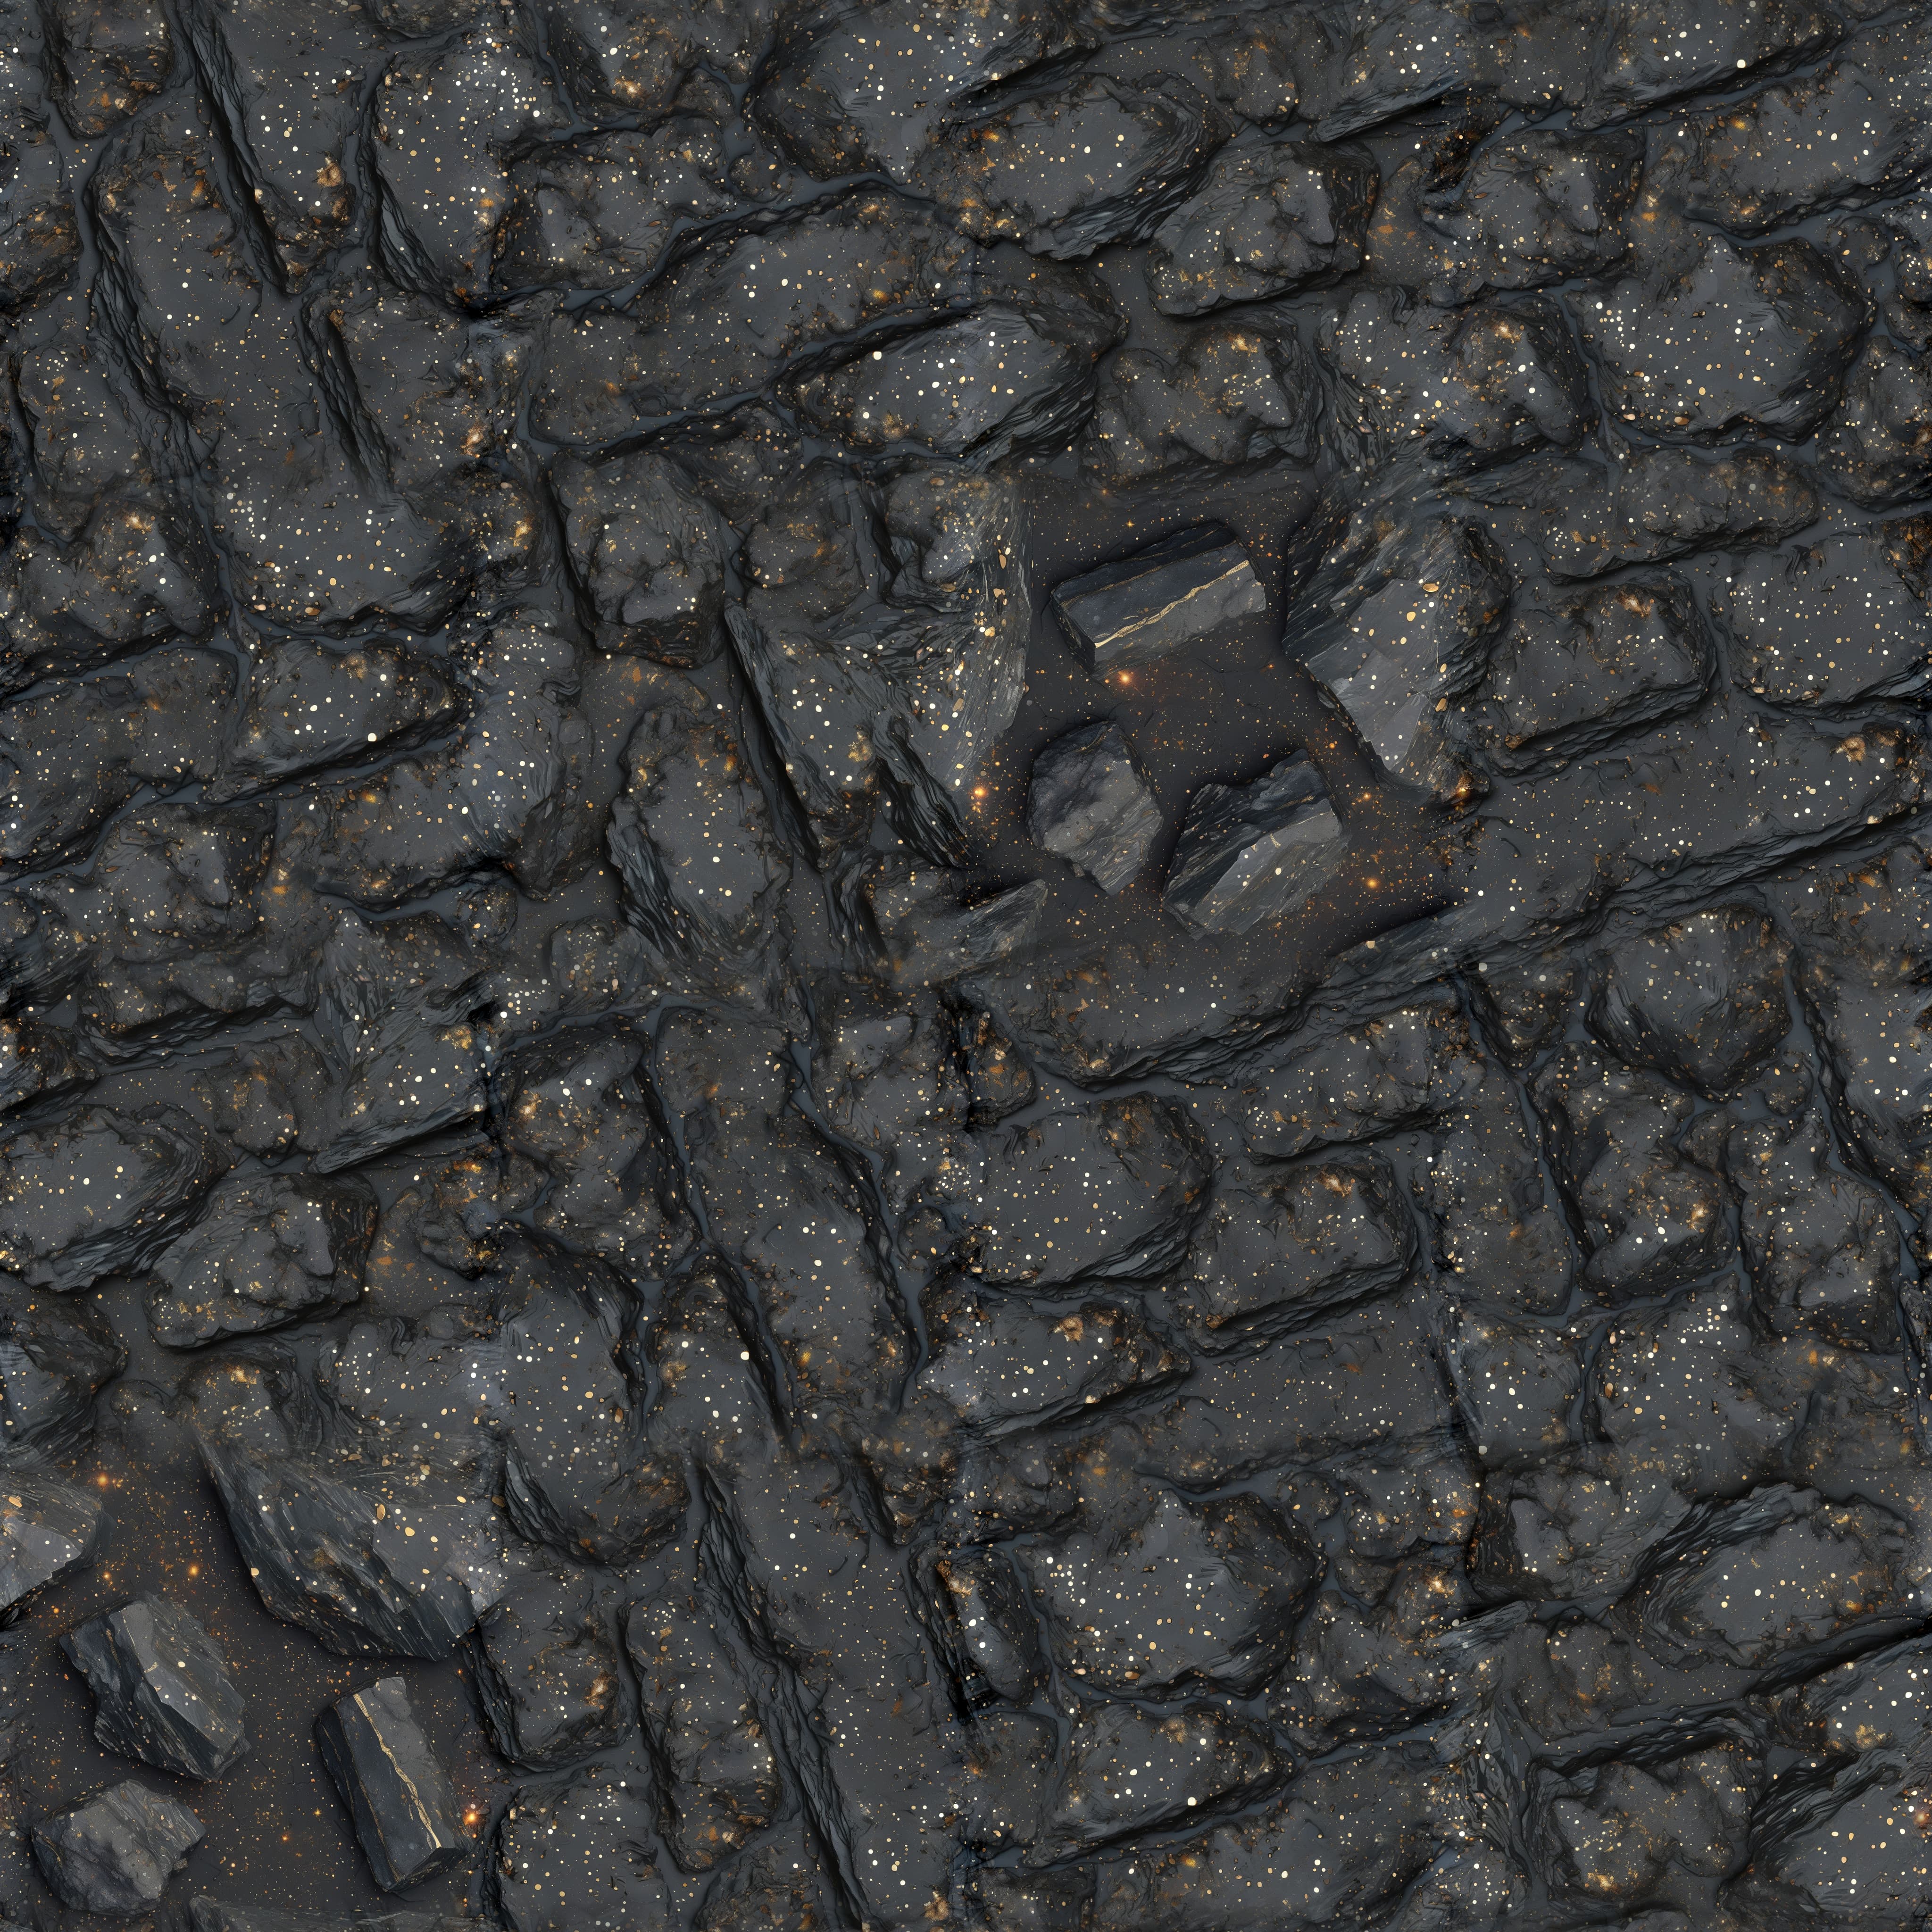
I’ve come up with a pretty solid workflow for generating high-quality 4K PBR textures using Stable Diffusion XL and some other tools. I’m extremely impressed with the results so far, and I’ve only been playing around with this stuff for a few days now.
Here’s the kind of results I’m able to get:
Installing + Running Stable Diffusion XL with 7900 XTX⌗
I recently bought a 7900 XTX graphics card. It has 24GB of VRAM which is enough to generate 1024x1024 images with Stable Diffusion with no upscaling or other tricks required.
I chose the AUTOMATIC1111 WebUI for installing and running Stable Diffusion. It seems to be the most feature-rich and popular, and it supports AMD GPUs out of the box. I cloned the repository, ran the ./run_webui.sh script, and it handled automatically installing dependencies and downloading Stable Diffusion weights and other model files.
To run it, I needed to do a few manual things. I got a segfault on my first run but was able to work around this by setting two environment variables:
export CL_EXCLUDE=gfx1036
export HSA_OVERRIDE_GFX_VERSION=11.0.0
I’m currently using ROCm v5.5 which I believe is why this is required. That version adds support for AMD 7000-series GPUs, but the support isn’t quite complete. These environment variables trick Pytorch and other libraries into thinking it’s some other model and making it work.
I previously wrote some notes about installing ROCm and TensorFlow with the 7900 XTX. They might already be out of date, though.
Anyway, after installing and exporting those environment variables, the web UI started up and images were generating!
Prompts⌗
The first step of the process was finding some good prompts for texture generation. This is of course the most creative part of the whole thing and has the biggest impact on your results.
I don’t have a ton of guidance here; it largely depends on what you’re trying to generate and the style you’re looking to get. However, here’s an example of a prompt that I’ve had a lot of success with:
top-down image of rough solid flat dark, rich slate rock. interspersed with bright ((flecks)) of ((glinting)) metallic spots like mica. high quality photograph, detailed, realistic
Negative Prompt: blurry, cracks, crevice, round, smooth, distinct, pebble, shadows, coin, circle
Note the parenthesis around some words. That’s a feature of the AUTO1111 webui I’m using, and it tells the model to pay more attention to the parts of the prompt surrounded by them. There are some other fancy prompt syntax tricks as well; tons of flexibility and options to explore.
Params⌗
The next step is coming up with good parameters for the generation.
I’ve found that Stable Diffusion XL is actually more sensitive to the chosen params than older versions. On top of that, there are WAY more things to tweak than there was a year ago. As a result, it did take a good while to come up with settings that resulted in images I was happy with.
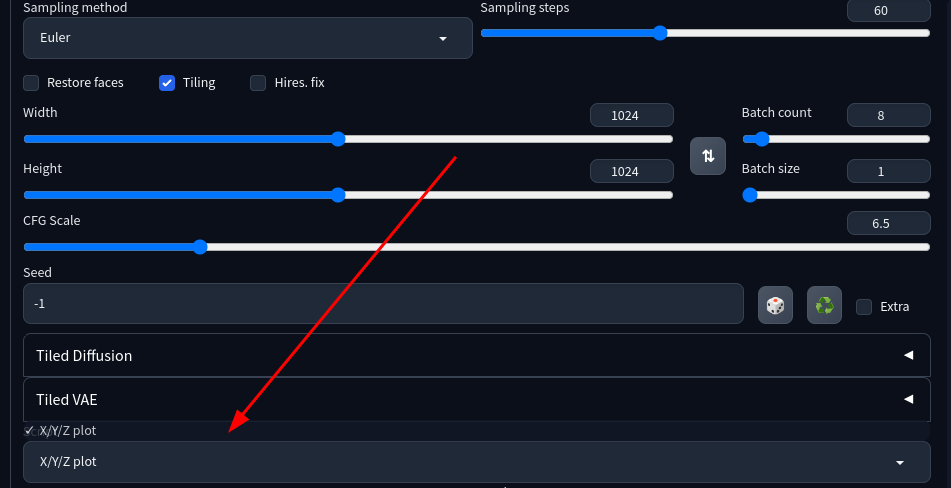
To help with this, I made extensive use of the “X/Y/Z Plot” feature of the AUTO1111 webui. It’s located in the “Script” dropdown of the UI:
It generates grids of output images where each cell is generated with a different combination of parameters. Here’s what the output looks like when using it:
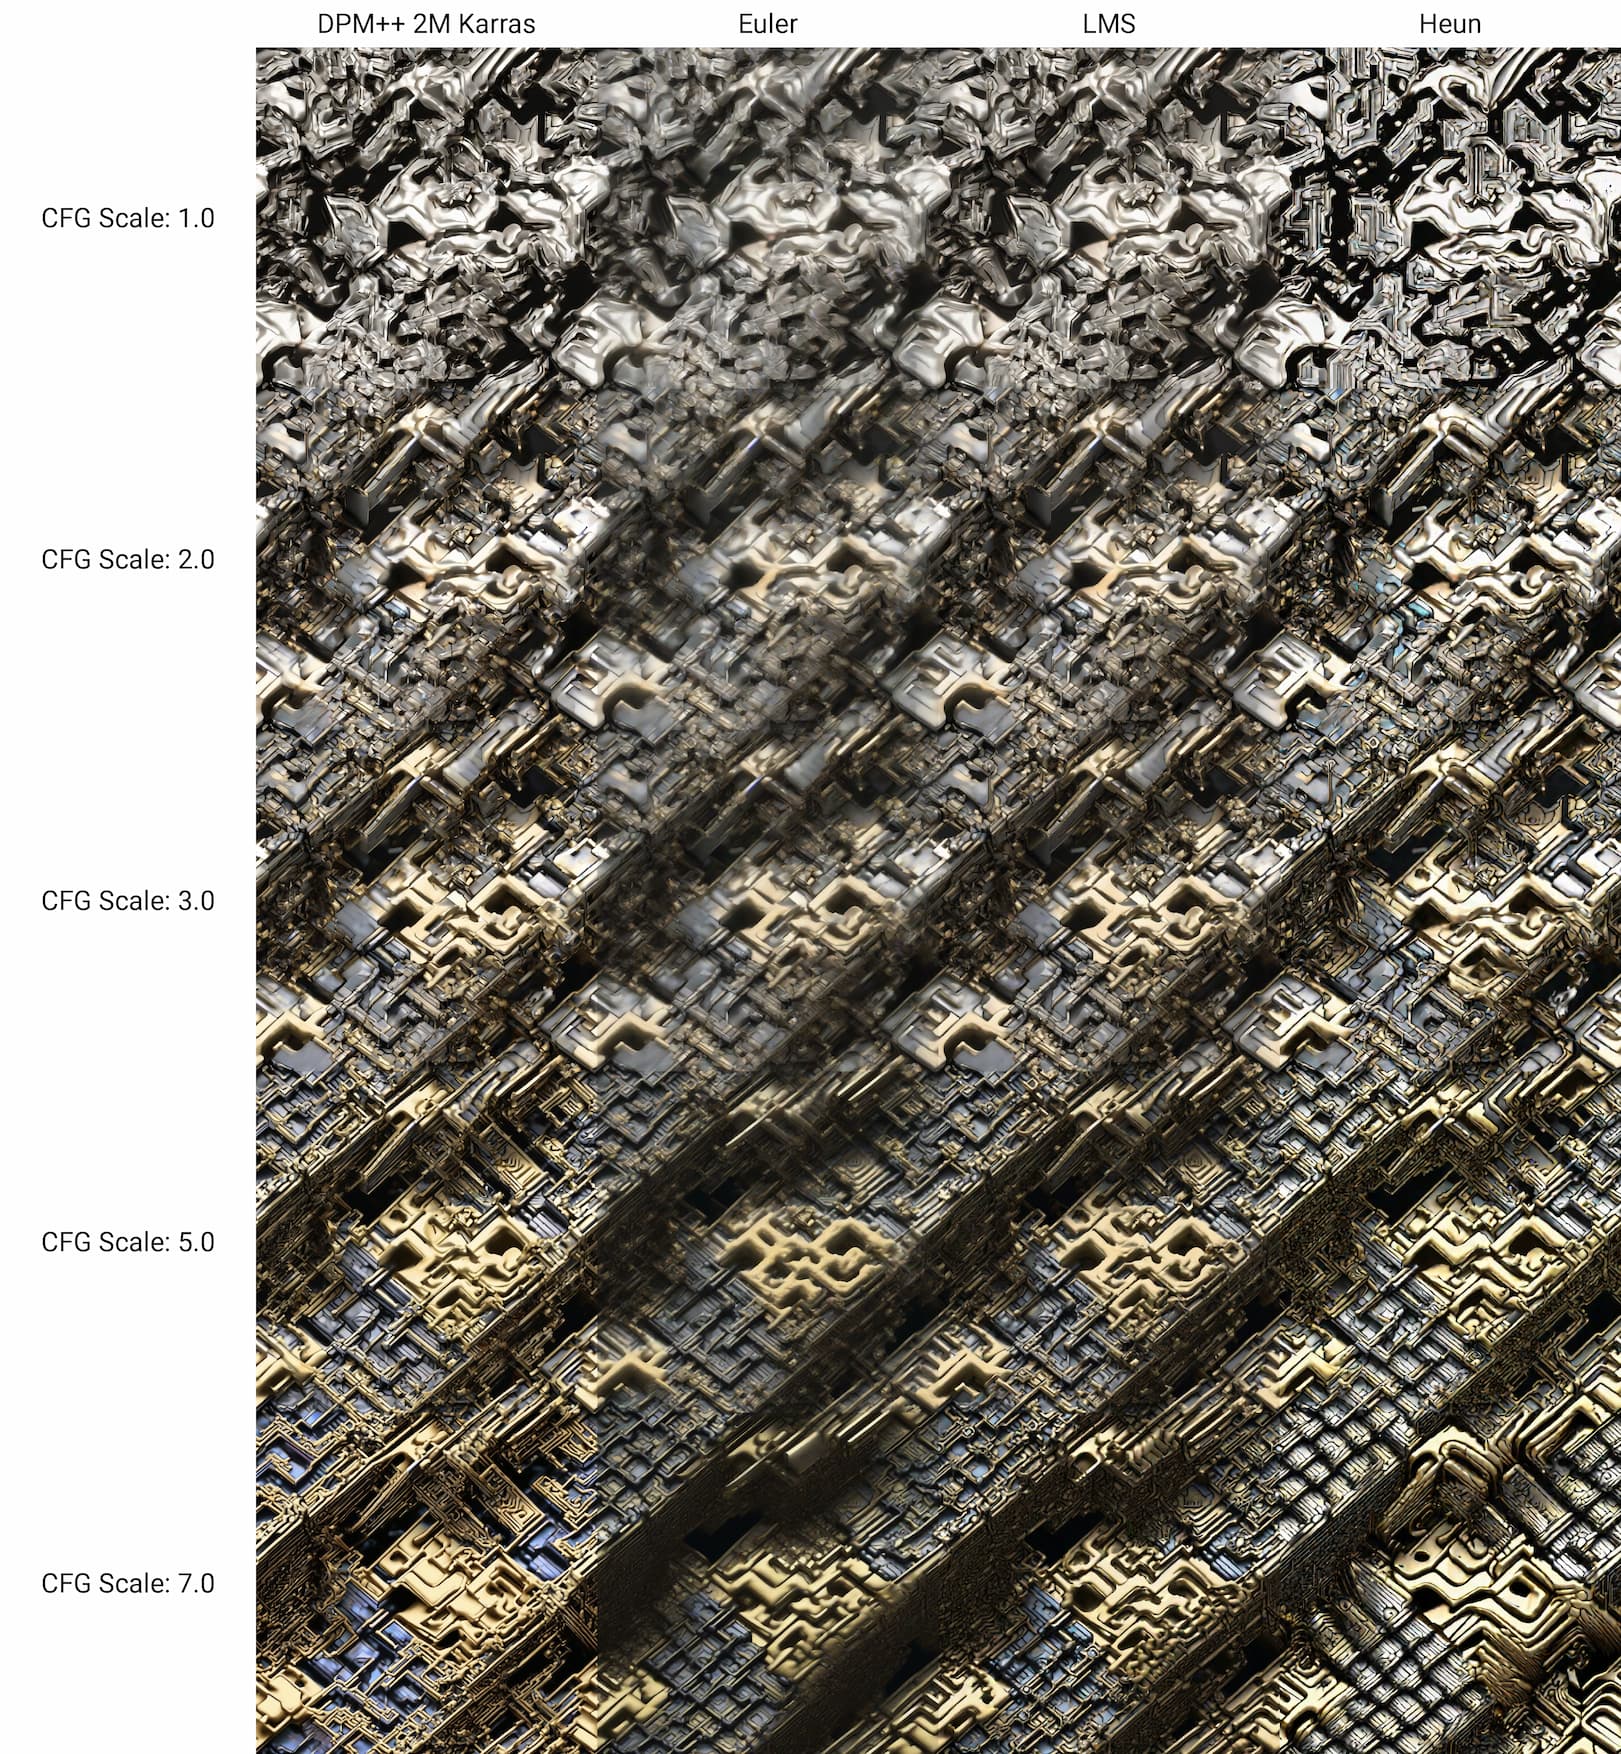
It was extremely useful for zeroing in on a good set of baseline params for my images.
After a lot of experimentation, here’s the baseline params I now use to start with when generating new textures:
- Sampling method: Euler
- Sampling steps: 60
- Width/Height: 1024x1024
- CFG Scale: 6.5 (I found that getting this right is especially important)
- Tiling: Enabled (needed to generate textures that tile seamlessly; extremely important)
- Hires. fix: Disabled (I had bad luck with everything I tried with this enabled)
You’ll probably have to experiment yourself to find params that work well for your use-case, but these might work as a good baseline when getting started.
One other thing I observed is that enabling tiling causes generated images to be pretty significantly different overall. This makes it tricky when, say, generating images with the Stable Diffusion Dream Studio online to take advantage of their fast GPUs and then trying to replicate those results locally. They don’t have the tiling option in their hosted UI and don’t allow tuning some params like sampler, so getting an exact match is difficult.
Converting Textures from 1K to 4K⌗
Once I found a good prompt and good params, I just set it to generate a bunch images and let it go! I let it run for around 2 hours and god a selection of ~50 images. A lot are bad, but there are more than enough gems in the bunch to work with.
One thing you may have noted is that I said “4K textures” in the title of this post but all the images I’ve generated so far are 1K. Well if you thought I was going to say that I did something along the line of upscaling using one of the many possible methods, you’d be wrong actually!
I created a unique method for combining AI-generated textures together to generate higher-resolution outputs. The resulting textures retain the seamless/infinitely tiling property of the source images.
I built a tool that runs in the browser to do this in an easy way. You can use it here (it’s 100% free and open source): https://texture-utils.ameo.design/seamless-stitcher/
The process is very simple. You drag and drop 4 similar-looking seamless-tiling Stable Diffusion-generated textures and it combines them together. As I mentioned, the output will also be seamless-tiling as well and go up in resolution by 4x.
Here’s what the UI for the tool looks like:
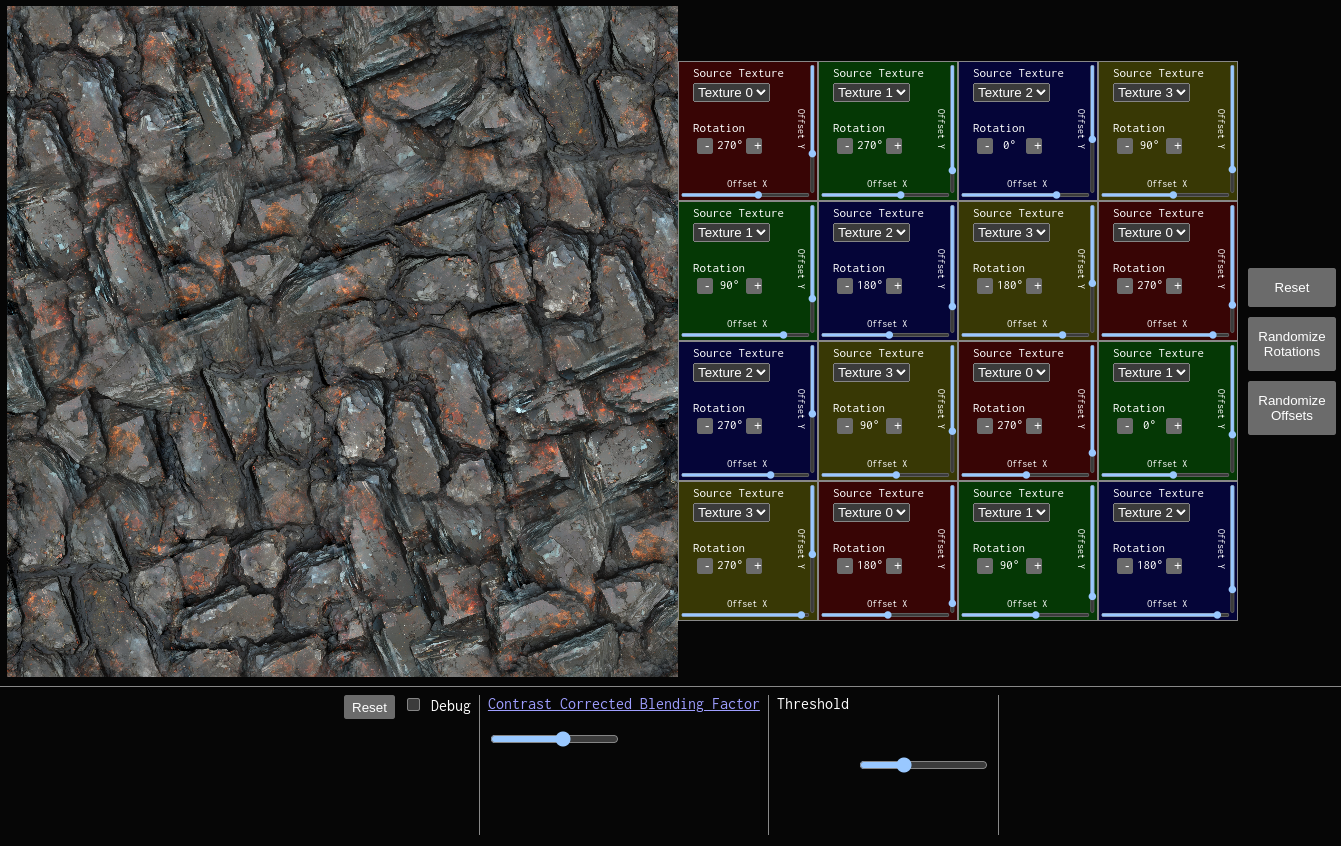
You can right-click the generated image and select “Save Image As” to download the result as a PNG. The outputs by default are extremely large, so you may want to use a tool like squoosh to compress/optimize it.
Compared to Stable Diffusion and other AI tools, the implementation is actually quite low-tech. But I’ve found that the results are very good overall!
It works best with images that look quite similar to each other. If there are big differences in style, color, etc. it can be obvious in the resulting output and look bad.
A great way to get very similar-looking source images is to find a generated image that you like and then generate variations of it. To do this, take the generated image and upload it to the “PNG Info” tab of the AUTO1111 web UI. Then, click the “send to txt2img” button and it will pre-populate the UI with all the params used to generate it.
Then, tick the “Extra” checkbox on the txt2img tab. Set “Variation strength” to something small like 0.1-0.3 and generate a dozen or so images. They should look similar to the original overall but with different details. If you choose 4 of those to upload to the seamless texture stitcher tool, I’ve found that the output usually looks good.
Building PBR Textures⌗
Once you have a stitched 4K image you’re happy with, it’s time to make them into full PBR textures.
For this, I use a tool called Poly. They provide an AI-powered texture generator that takes an image as input and generates normal, height, ambient occlusion, metalness, and roughness maps for it. They also provide their own prompt-based generation tools, but I personally prefer the control that generating it myself provides.
Their tool lets you generate normal and height maps for free, but they charge you $20/month to generate others. I do personally pay for that subscription right now, but you don’t have to in order to get good results. The normal map is the most important part, can you can either set global roughness/metalness values for your texture (this is all you need a lot of the time) or write a custom shader to generate them on the fly from pixel values.
Another method you can use to generate normal maps is SmartNormap. It uses a non-AI approach to programmatically generate normal maps for any source image. It has some params you can tweak, and the results are OK but generally less good than the AI-powered Poly tool overall in my experience.
Anyway, yeah at that point you can download your maps and plug them into Blender, Three.JS, or whatever other 3D software you want.
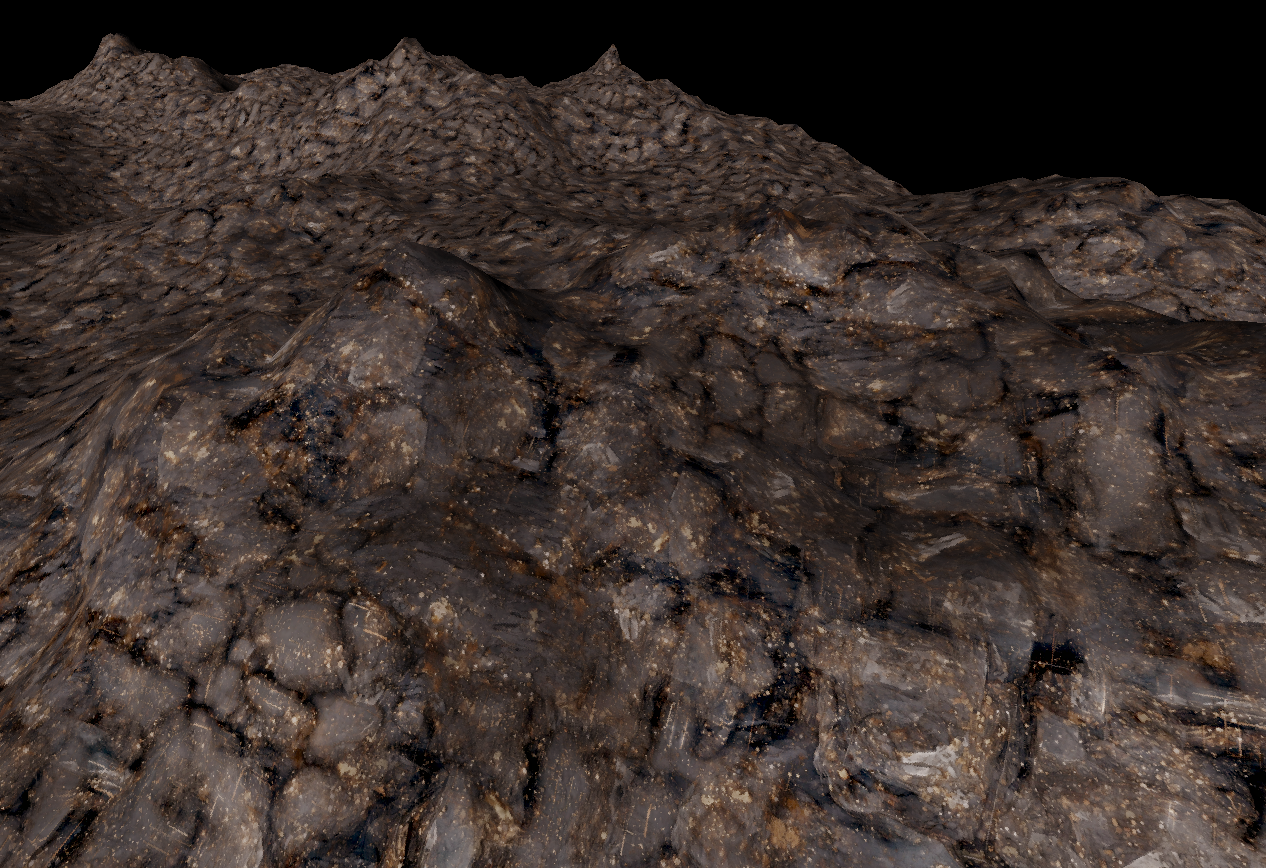
If you want to get even crazier with it, the seamless 4K output texture can be used with a hex tiling algorithm to make it tile infinitely with no repetition whatsoever. I’m working on a Three.JS library to handle this automatically, and here’s what it looks like laid out on some terrain I generated in Blender:
Conclusion⌗
It really feels like the floodgates are opened here. I personally find that using AI image generates for textures and other building-block assets rather than full images or artwork to be the way to go. There’s a lot of room for my creativity and input to guide the entire process. There are infinite possibilities to explore, and the whole process is quite fun in my opinion.
Anyway, I hope you found some of this helpful, and I wish you good luck if you decide to try this out for yourself.